PLESK PANEL:
In Plesk Panel, Windows-based hosting is done for accounts and servers. Account, files, applications, and email that are hosted on account or server can be easily managed. The tasks related to the web hosting business and the business operations of server are automated using Plesk Panel.
DKIM:
DKIM is also known as DomainKeys Identified Mail. DKIM associates the domain name identity with an outgoing message. It is also used to validate the domain name identity for incoming message. The validation is done by cryptographic techniques. It attaches a digital signature which is generated automatically and this responsibility is taken by an organization that sends a message. Postfix (Linux), Qmail, MailEnable Professional, MailEnable Standard, SmarterMail and IceWarp are the Mail Servers that are supported by DKIM.
ENABLING DKIM IN THE PLESK PANEL:
DKIM will be enabled when the DomainKeys functionality are given in Plesk.
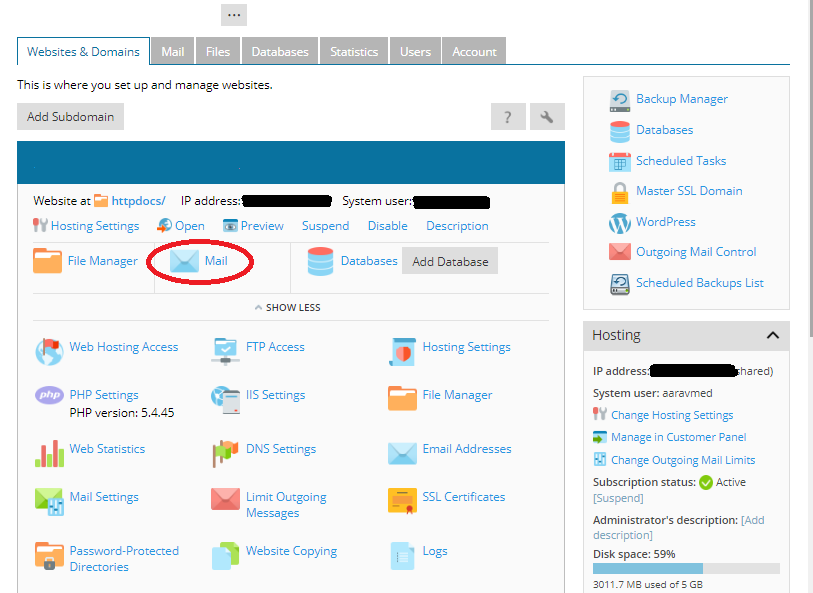
Step 1: To enable DKIM in the Plesk Panel related subscription for managing is opened. Then Mail Settings in Mail tab is selected.
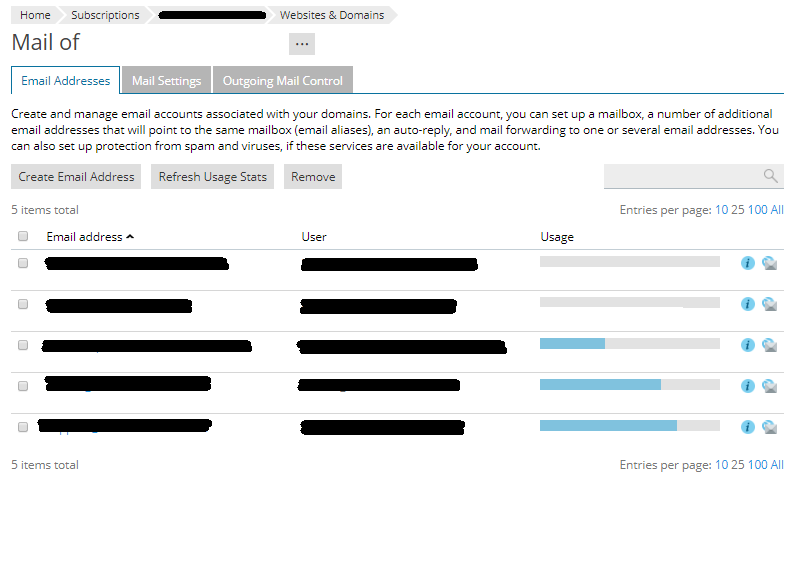
Step 2: Next, Select Domain and click the Activate/Deactivate Services.
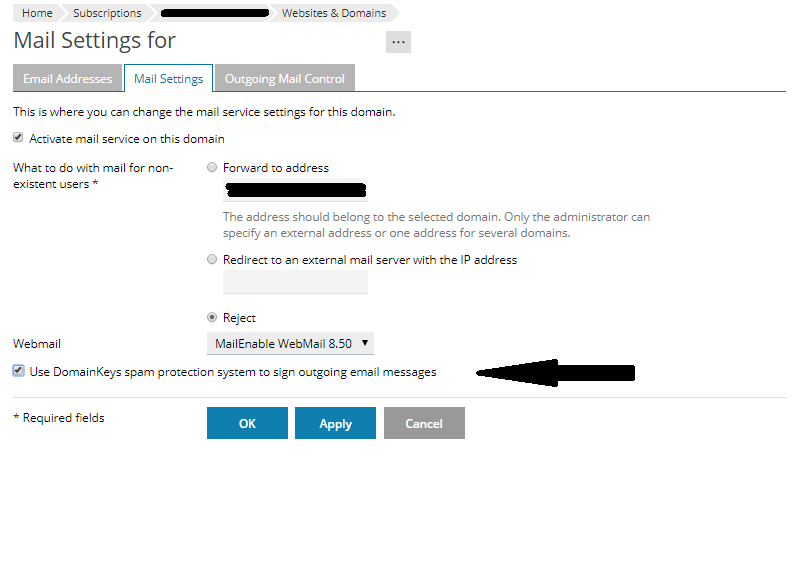
Step 3: Then for DKIM spam protection system to sign outgoing email messages, select Enable and at last click OK.
Step 4: After activating DKIM default._domainkey.<example.com> and _ domainkey.<example.com> records are added to the Plesk.
SPF:
SPF is Sender Policy Framework and it prevents forgery of sender address. Authorization of particular host is done where a mail is send from the domain by setting a policy. Domain’s administrators setup the policies. Domain’s administrator authorizes the mail that comes from the domain. SRS is Sender Rewriting Scheme. Plesk uses SRS to check SPF and the administrator in the sender’s DNS zone specifies the rules for SPF. Postfix (Linux), Qmail, MailEnable Professional, SmarterMail and IceWarp are the Mail Servers that are supported by SPF.
ENABLING SPF IN THE PLESK PANEL:
Enabling of SPF is done and incoming mails are checked. DNS looking up is done by Mail server on the sender’s host and it searches the SPF-related DNS record. Local Rules and Guess rules are defined here. Before the mail server checks the SPF, local rules are used by the spam filter. A domain applies the guess rules and SPF records may not be published by them.
Step 1: To enable SPF in Tools & Settings option and select Mail Server Settings in the Mail group.
Step 2: In the settings tab, server-wide mail preferences screen is opened. Next select Enable SPF Protection to check incoming mail checkbox in the SPF Spam protection section.
Step 3:If you want SPF to continue checking, select SPF checking continues when there are DNS lookup problems when DNS lookup fails.
Step 4: Next is applying local and guess rules in SPF and to do this, select an option from the SPF checking mode drop-down box.
Step 5: Then SPF local rules box is used to specify local rules. In the SPF guess rules box, guess rules are specified.
Step 6: Next in SPF explanation textbox, an arbitrary error notice is mentioned. When a message is rejected, error notice is returned to the SMTP sender.
Step 7: At last click OK to finish the task of enabling the SPF in Pesk Panel.
In Plesk Panel, Windows-based hosting is done for accounts and servers. Account, files, applications, and email that are hosted on account or server can be easily managed. The tasks related to the web hosting business and the business operations of server are automated using Plesk Panel.
DKIM:
DKIM is also known as DomainKeys Identified Mail. DKIM associates the domain name identity with an outgoing message. It is also used to validate the domain name identity for incoming message. The validation is done by cryptographic techniques. It attaches a digital signature which is generated automatically and this responsibility is taken by an organization that sends a message. Postfix (Linux), Qmail, MailEnable Professional, MailEnable Standard, SmarterMail and IceWarp are the Mail Servers that are supported by DKIM.
ENABLING DKIM IN THE PLESK PANEL:
DKIM will be enabled when the DomainKeys functionality are given in Plesk.
Step 1: To enable DKIM in the Plesk Panel related subscription for managing is opened. Then Mail Settings in Mail tab is selected.
Step 2: Next, Select Domain and click the Activate/Deactivate Services.
Step 3: Then for DKIM spam protection system to sign outgoing email messages, select Enable and at last click OK.
Step 4: After activating DKIM default._domainkey.<example.com> and _ domainkey.<example.com> records are added to the Plesk.
SPF:
SPF is Sender Policy Framework and it prevents forgery of sender address. Authorization of particular host is done where a mail is send from the domain by setting a policy. Domain’s administrators setup the policies. Domain’s administrator authorizes the mail that comes from the domain. SRS is Sender Rewriting Scheme. Plesk uses SRS to check SPF and the administrator in the sender’s DNS zone specifies the rules for SPF. Postfix (Linux), Qmail, MailEnable Professional, SmarterMail and IceWarp are the Mail Servers that are supported by SPF.
ENABLING SPF IN THE PLESK PANEL:
Enabling of SPF is done and incoming mails are checked. DNS looking up is done by Mail server on the sender’s host and it searches the SPF-related DNS record. Local Rules and Guess rules are defined here. Before the mail server checks the SPF, local rules are used by the spam filter. A domain applies the guess rules and SPF records may not be published by them.
Step 1: To enable SPF in Tools & Settings option and select Mail Server Settings in the Mail group.
Step 2: In the settings tab, server-wide mail preferences screen is opened. Next select Enable SPF Protection to check incoming mail checkbox in the SPF Spam protection section.
Step 3:If you want SPF to continue checking, select SPF checking continues when there are DNS lookup problems when DNS lookup fails.
Step 4: Next is applying local and guess rules in SPF and to do this, select an option from the SPF checking mode drop-down box.
Step 5: Then SPF local rules box is used to specify local rules. In the SPF guess rules box, guess rules are specified.
Step 6: Next in SPF explanation textbox, an arbitrary error notice is mentioned. When a message is rejected, error notice is returned to the SMTP sender.
Step 7: At last click OK to finish the task of enabling the SPF in Pesk Panel.