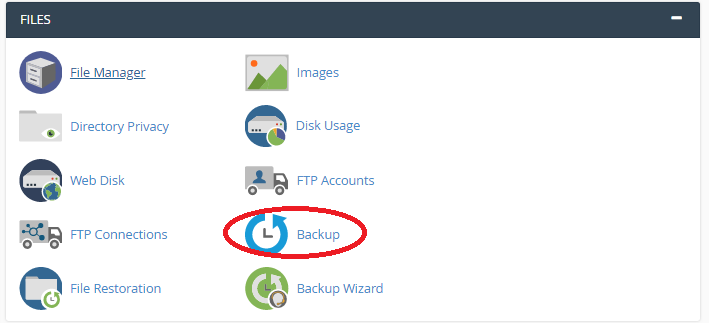
Restoring cPanel backup:
As a professional, you would have come across many re-storage. It is common to restore the cPanel backup for addon domains. You can ask why? What is the reason behind it? If you are going to use another cPanel account, will you waste your time by downloading all the addon. No right? You have an option to restore them as a backup option in the cPanel account. This is fully a manual process where the automated way is not recommended yet. You can even merge or separate two cPanel accounts to restore the addon backup option.
Generally, the cPanel account has two types of theme such as cPanel paper_lantern theme and cPanel x3 theme.
Let us see the addon backup for the above two process with clear explanation: The lantern theme has few restoration methods such as file restoration, database restoration, updating configuration files and email restoration.
Before that you should notice domain.com and addon.com differences. Domain.com is known as the cPanel account which has the primary link association. Addon.com is known as domain which is considered as the addon into the cPanel account. These two processes holds the same position in same account.
Let us start with the cPanel paper_lantern theme – file restoration:
Step 1: Using the FTP, you should upload to the desktop folder. Backup-3.24.2018_16-49-26_domain.tar.gz.
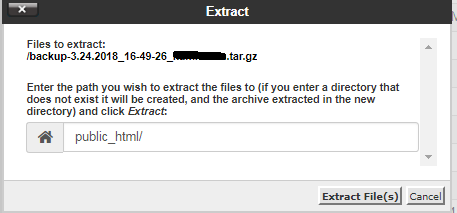
Step 2: From the cPanel, select file and then File manager. Then select settings >> show hidden files >> Save. Select the backup file and tap the “Extract” option on the top.

Step 3: Once if you finish all the process, you will get a window displaying “Extract files” option. Tap on it and you observe the extraction process. Now select the option “Reload”. It will start to reload and choose “Homedir”. Inside it clicks on the folder “public_html”.
Step 4: It is the Wordpress for the domain.com and you can check the addon.com folder too. Now you will find "homedir >> Public_html >> Here you find all the wordpress files". Also you can find Addon.com folder with other files. Select all the files from "Select All" and right click on it to copy files.
Step 5: Immediately, you will get the pop window. Enter /public_html and click “Copy files”. That’s it. You have restored the file.
Method 2: Database restoration:
Step 1: Again use the /Backup-3.24.2018_16-49-26_domain. Search for the folder “mysql”. Once if it opened, you can see many files ended with .sql. From that choose folder to download into our computer such as wordpress_wp120.sql.
You have two methods such as:
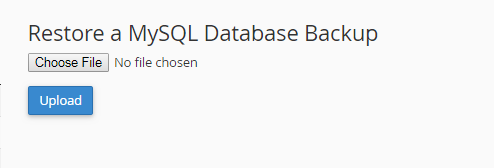
1. cPanel >> Backup >> Browse >> Upload.
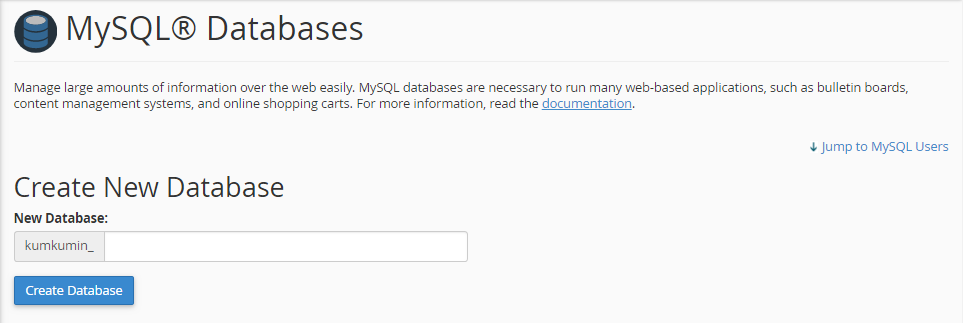
How to create a database in cPanel?
cPanel >> Mysql database >> enter name >> create database – username and password >> create user >> All privileges >> save.

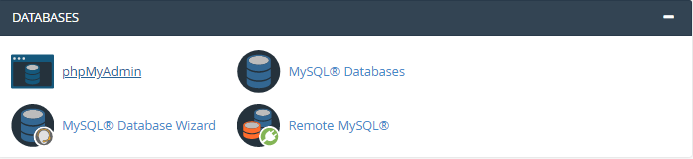
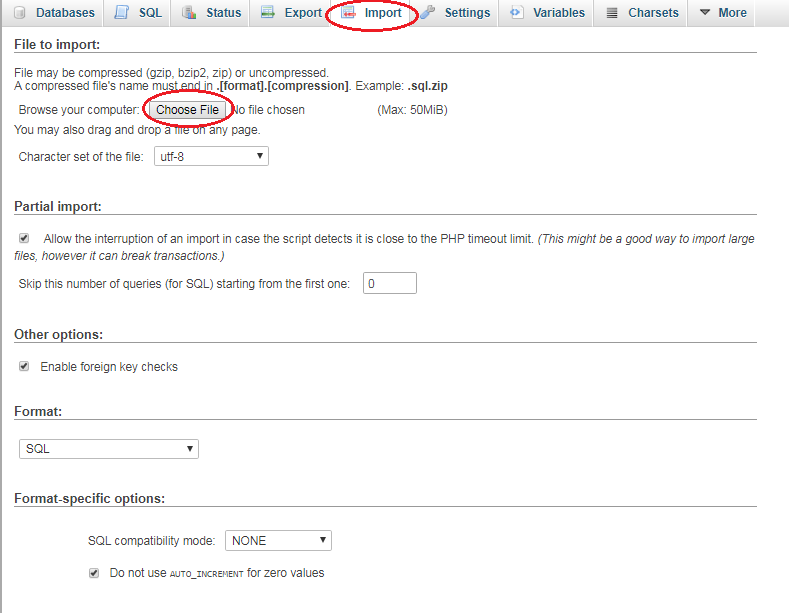
2. cPanel >> phpMyAdmin >> click (+) >> tap on database name >> import >> browse >> go.
Note: You have done the addon backup restoration using database restoration method.
Method 3: Database configuration files:
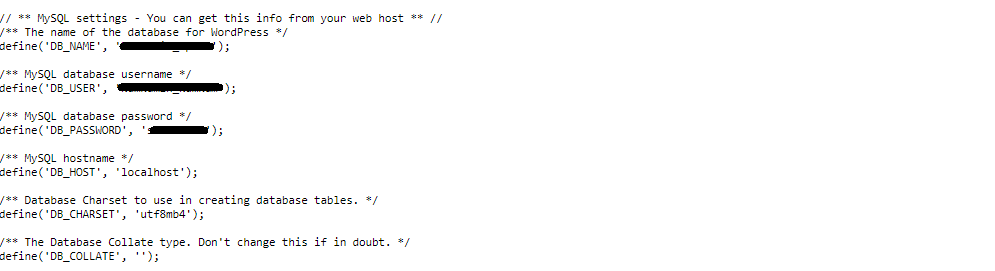
Step 1: Search public_html and click on “config” file. From there choose “settings.inc.php” and right click on it. You have an option “Edit” and you will get the window in Wordpress. Just cross-check the 3 lines such as
define (‘_DB_NAME_’,’wordpress_wp120’);
define (‘_DB_USER_’,’wordpress_wp120’);
define (‘_DB_PASSWD_’,’6feb%;qf4‘);
Note: If the above statement is correct then the work for Prestashop has been completed.
Step 2: Now, from the restored folder of public_html search for addon.com. You have a file called “wp-config.php” and right click on it. Here you need to check 3 lines such as:
define (‘_DB_NAME_’,’wordpress_wp120’);
define (‘_DB_USER_’,’wordpress_wp120’);
define (‘_DB_PASSWD_’,’6feb%;qf4‘);
Note: Now you can open both the addon.com and domain.com using the browser.
3. Emails:
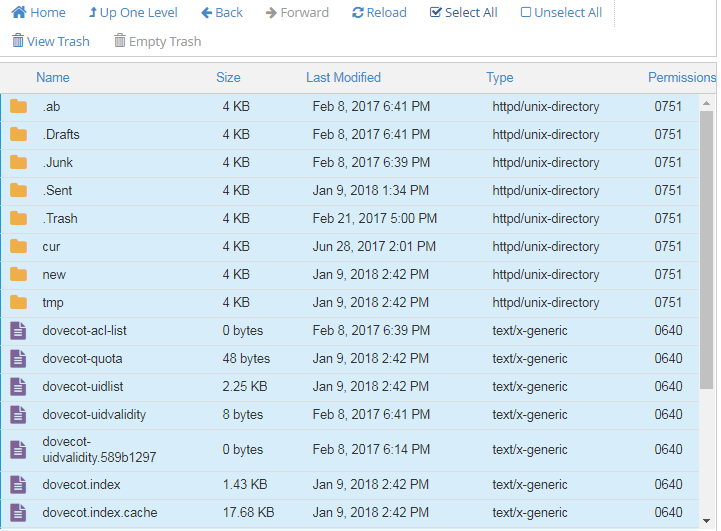
Now, from the cPanel account select the “Email accounts” option and search for backup folder. From there select “File manager” and choose “Homedir”. You will get the folder for "mails". Just select it and tap on domain.com.
Check for the option “Show hidden files (dotfiles) >> settings >> save.
In the admin folder, you can notice all your emails in the type of folder. Just copy it by “select all” >> enter /mail/domain.com/admin in the pop window >> copy files.
Note: That’s it! You have done for latern theme in the cPanel account.
For cPanel x3 theme, follow the below coding properly – file restoration:
Step 1: File restoration: Upload the file backup-4.4.2014_domain.tar.gz> Extract> reload> Backup-3.24.2018_16-49-26_domain >> homedir >> public_html >> select all >> copy.
Step 2: Enter /public_html and copy files directly.
Method 2: Database restoration:
Step 1:/Backup-3.24.2018_16-49-26_domain >> mysql >> wordpress_wp120.sql.
Step 2: cPanel >> restoration >> backups >> upload.
Step 3: create a database – cPanel >> Mysql databases >> create database username and password >> All privileges >> save.
Step 4: Alternate to step 3:
cPanel >> Mysql database >> phpMyAdmin >> +(left side) >> import >> browse >> Go.
Method 3: Database configuration files:
Step 1: Public_html >> wp-config.php >> right click >> edit.
Step 2: Cross check the below lines:
define (‘_DB_NAME_’,’wordpress_wp120’);
define (‘_DB_USER_’,’wordpress_wp120’);
define (‘_DB_PASSWD_’,’6feb%;qf4‘);
Step 3: Public_html >> config >> settings.inc.php >> edit.
Cross check (wordpress_wp120’), (wordpress_wp120’) and (‘6feb%;qf4’)
Method 4:
Emails:
Step 1: cPanel >> email accounts >> backup folder >> homedir >> .contact@domain_com >> select all >> copy.
Step 2: In pop window, enter /mail/.contact@domain_com >> copy files.
As a professional, you would have come across many re-storage. It is common to restore the cPanel backup for addon domains. You can ask why? What is the reason behind it? If you are going to use another cPanel account, will you waste your time by downloading all the addon. No right? You have an option to restore them as a backup option in the cPanel account. This is fully a manual process where the automated way is not recommended yet. You can even merge or separate two cPanel accounts to restore the addon backup option.
Generally, the cPanel account has two types of theme such as cPanel paper_lantern theme and cPanel x3 theme.
Let us see the addon backup for the above two process with clear explanation: The lantern theme has few restoration methods such as file restoration, database restoration, updating configuration files and email restoration.
Before that you should notice domain.com and addon.com differences. Domain.com is known as the cPanel account which has the primary link association. Addon.com is known as domain which is considered as the addon into the cPanel account. These two processes holds the same position in same account.
Let us start with the cPanel paper_lantern theme – file restoration:
Step 1: Using the FTP, you should upload to the desktop folder. Backup-3.24.2018_16-49-26_domain.tar.gz.
Step 2: From the cPanel, select file and then File manager. Then select settings >> show hidden files >> Save. Select the backup file and tap the “Extract” option on the top.
Step 3: Once if you finish all the process, you will get a window displaying “Extract files” option. Tap on it and you observe the extraction process. Now select the option “Reload”. It will start to reload and choose “Homedir”. Inside it clicks on the folder “public_html”.
Step 4: It is the Wordpress for the domain.com and you can check the addon.com folder too. Now you will find "homedir >> Public_html >> Here you find all the wordpress files". Also you can find Addon.com folder with other files. Select all the files from "Select All" and right click on it to copy files.
Step 5: Immediately, you will get the pop window. Enter /public_html and click “Copy files”. That’s it. You have restored the file.
Method 2: Database restoration:
Step 1: Again use the /Backup-3.24.2018_16-49-26_domain. Search for the folder “mysql”. Once if it opened, you can see many files ended with .sql. From that choose folder to download into our computer such as wordpress_wp120.sql.
You have two methods such as:
1. cPanel >> Backup >> Browse >> Upload.
How to create a database in cPanel?
cPanel >> Mysql database >> enter name >> create database – username and password >> create user >> All privileges >> save.
2. cPanel >> phpMyAdmin >> click (+) >> tap on database name >> import >> browse >> go.
Note: You have done the addon backup restoration using database restoration method.
Method 3: Database configuration files:
Step 1: Search public_html and click on “config” file. From there choose “settings.inc.php” and right click on it. You have an option “Edit” and you will get the window in Wordpress. Just cross-check the 3 lines such as
define (‘_DB_NAME_’,’wordpress_wp120’);
define (‘_DB_USER_’,’wordpress_wp120’);
define (‘_DB_PASSWD_’,’6feb%;qf4‘);
Note: If the above statement is correct then the work for Prestashop has been completed.
Step 2: Now, from the restored folder of public_html search for addon.com. You have a file called “wp-config.php” and right click on it. Here you need to check 3 lines such as:
define (‘_DB_NAME_’,’wordpress_wp120’);
define (‘_DB_USER_’,’wordpress_wp120’);
define (‘_DB_PASSWD_’,’6feb%;qf4‘);
Note: Now you can open both the addon.com and domain.com using the browser.
3. Emails:
Now, from the cPanel account select the “Email accounts” option and search for backup folder. From there select “File manager” and choose “Homedir”. You will get the folder for "mails". Just select it and tap on domain.com.
Check for the option “Show hidden files (dotfiles) >> settings >> save.
In the admin folder, you can notice all your emails in the type of folder. Just copy it by “select all” >> enter /mail/domain.com/admin in the pop window >> copy files.
Note: That’s it! You have done for latern theme in the cPanel account.
For cPanel x3 theme, follow the below coding properly – file restoration:
Step 1: File restoration: Upload the file backup-4.4.2014_domain.tar.gz> Extract> reload> Backup-3.24.2018_16-49-26_domain >> homedir >> public_html >> select all >> copy.
Step 2: Enter /public_html and copy files directly.
Method 2: Database restoration:
Step 1:/Backup-3.24.2018_16-49-26_domain >> mysql >> wordpress_wp120.sql.
Step 2: cPanel >> restoration >> backups >> upload.
Step 3: create a database – cPanel >> Mysql databases >> create database username and password >> All privileges >> save.
Step 4: Alternate to step 3:
cPanel >> Mysql database >> phpMyAdmin >> +(left side) >> import >> browse >> Go.
Method 3: Database configuration files:
Step 1: Public_html >> wp-config.php >> right click >> edit.
Step 2: Cross check the below lines:
define (‘_DB_NAME_’,’wordpress_wp120’);
define (‘_DB_USER_’,’wordpress_wp120’);
define (‘_DB_PASSWD_’,’6feb%;qf4‘);
Step 3: Public_html >> config >> settings.inc.php >> edit.
Cross check (wordpress_wp120’), (wordpress_wp120’) and (‘6feb%;qf4’)
Method 4:
Emails:
Step 1: cPanel >> email accounts >> backup folder >> homedir >> .contact@domain_com >> select all >> copy.
Step 2: In pop window, enter /mail/.contact@domain_com >> copy files.