ADDON DOMAIN:
An addon domain is a functional domain and is created within your Plesk panel. In addon, multiple hosting packages share the same control panel. Email addresses and forwarders are created in the same way as a primary domain on the account. The files share the same control panel and server. When you are hosting more than one domain in same panel then it is said to be Addon domain.
Plesk is a control panel in your Windows-based hosting accounts and servers. We can easily manage the account, files, applications, and email hosted on your account or server. Using Plesk Panel, tasks that are related to your hosting business or server-based business operations are automated.
HOW TO ADD ADDON DOMAINS IN PLESK CONTROL PANEL:
Windows hosting package have more than one domain name or website, adding domains in Plesk panel is very easy. We have to register the domain name before adding a new domain. The new domain has to be registered.
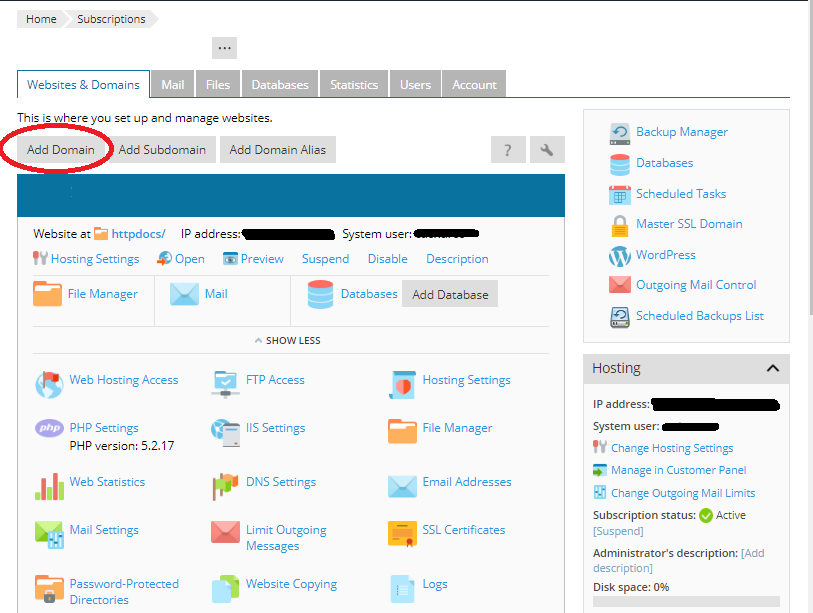
To host a new website with an addon domain name first we have to login to Plesk Control Panel. Then go to the Websites and Domain. Here you can setup and manage websites.
Step 1: Click "Add Domain" option to add addon domain. The DNS setting with the domain name and the domain name at the registrar’s side are connected.
Step 2: This connection is done by entering the plesk name server IP address into the NS record to registrar.
Step 3: To do this go to “Websites and Domains”, in that select domain name and then select "DNS Settings". Using the above option find the NS record and then find the A record corresponding to the NS record value.
Step 4: In the preferred domain select the URL to which the site visitors will be redirected. Then click OK. The new addon domain name is created and it is shown in the list at the bottom of the screen. Now you can upload your web content to the web space of the new addon domain website.
An addon domain is a functional domain and is created within your Plesk panel. In addon, multiple hosting packages share the same control panel. Email addresses and forwarders are created in the same way as a primary domain on the account. The files share the same control panel and server. When you are hosting more than one domain in same panel then it is said to be Addon domain.
Plesk is a control panel in your Windows-based hosting accounts and servers. We can easily manage the account, files, applications, and email hosted on your account or server. Using Plesk Panel, tasks that are related to your hosting business or server-based business operations are automated.
HOW TO ADD ADDON DOMAINS IN PLESK CONTROL PANEL:
Windows hosting package have more than one domain name or website, adding domains in Plesk panel is very easy. We have to register the domain name before adding a new domain. The new domain has to be registered.
To host a new website with an addon domain name first we have to login to Plesk Control Panel. Then go to the Websites and Domain. Here you can setup and manage websites.
Step 1: Click "Add Domain" option to add addon domain. The DNS setting with the domain name and the domain name at the registrar’s side are connected.
Step 2: This connection is done by entering the plesk name server IP address into the NS record to registrar.
Step 3: To do this go to “Websites and Domains”, in that select domain name and then select "DNS Settings". Using the above option find the NS record and then find the A record corresponding to the NS record value.
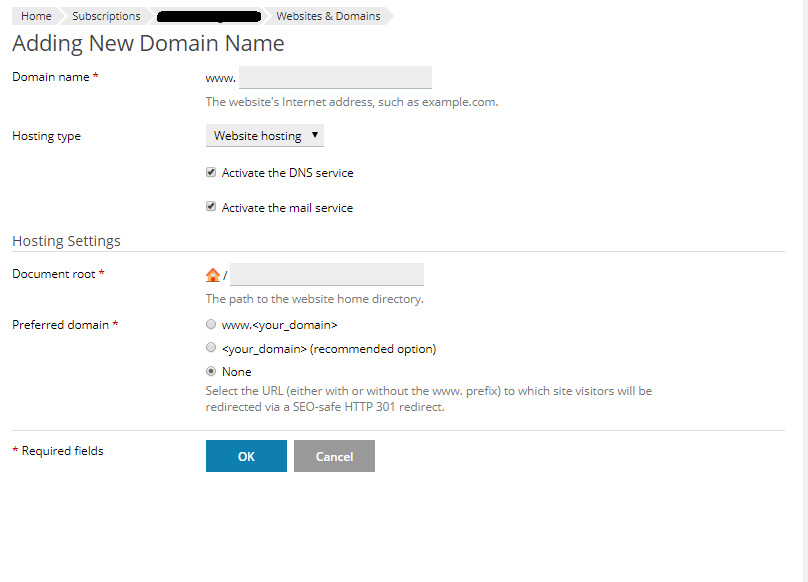
- The first option is Domain Name. Name of the Addon domain or the new domain which you want to add in your hosting account is specified here.
- Next option is Location. Location of the website’s file has to be specified here. Next is hosting type. Select the type of hosting you want to create in hosting type. If you want to host a website for this domain, select Website hosting.
- Next is Activate the DNS service. This specifies the DNS settings. There you can select whether you want to use local DNS server or external DNS server for the domain you are creating.
- Next is the "Activate the mail service". Here you can see Mail Settings. If you want to use email service for this new addon domain please select this option.
- Next comes to the "Hosting Settings". This has document root and preferred domain. In document root option enter the Path for the website home directory.
Step 4: In the preferred domain select the URL to which the site visitors will be redirected. Then click OK. The new addon domain name is created and it is shown in the list at the bottom of the screen. Now you can upload your web content to the web space of the new addon domain website.