Whenever you upload images, you should resize and scale them according to the requirement of the website. Finding the tool and changing the image size later you should upload it! Count it, friends! Kind of three jobs! Instead in Drupal, you can change the image size in cPanel itself. There is a perfect choice Image Scaler. Don’t worry about the name but look at the work it does with the best intelligence.
You can use this tool to resize the image whenever you want. It makes your work easier and faster too! Moreover, it helps you in giving result by faster loading pages.
Let’s start the process:
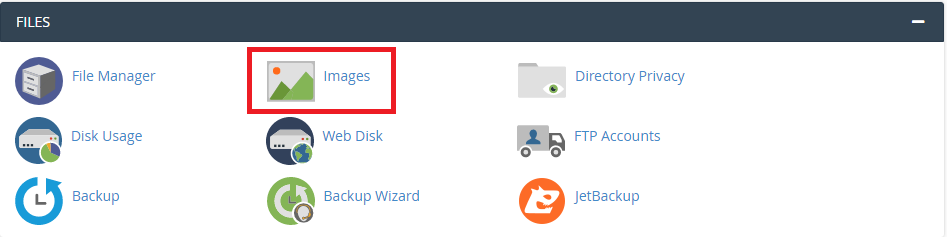
Step 1: Go to cPanel and then tap on the section “File”. It shows more options such as file manager, images, FTP accounts, FTP connections, and disk usage etc.
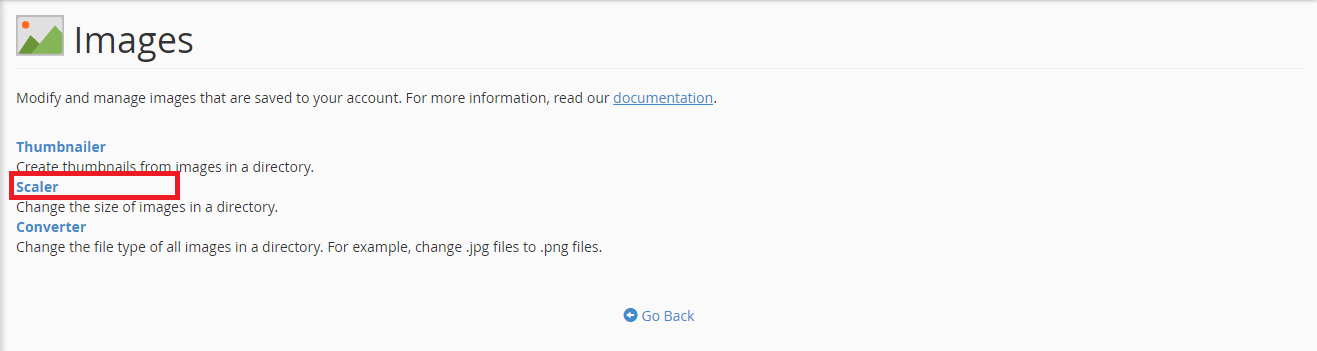
Step 2: Now choose the option “Image” and so, you can see three interlinked words such as thumbnailer, scaler and converter.
Step 3: Fix with the scaler option to resize the image. Then, it goes directly to the list of images on the website. Tap on the file public_html and select the image where you have saved it already.
Step 4: Choose the image to resize and scale it! It clearly shows the size and dimension of the images in detail.
Further, proceed with the page controls:
Per cent, new dimensions: Here, you can add the new dimension of images. Consider it by using the measurement of a per cent as per the image originality or pixel. Change the dimension of the image and check it by opening the image.
It clearly shows the work it done for resizing the image. Once if you upload the resized image later, you can change it to the original dimensions.
Aspect ratio: To avoid distortion or stretching, don’t enable this aspect ratio.
Retaining old images: Here, it happens the overriding from the previous to the new one. In case, if you want to have the original image then kindly do it by tapping on the option to retain a copy of the old image.
Filename and path: To make sure it's an old image it would automatically add up the word “old” to the original image for your reference. It’s a default job!
Once done, you can see the button “Scale image”. Tap on that button to resize the image you have. You will get the message by saying “Images scaled successfully”.
When again you check the directory, you can see the new as well as old images with the dimensions.
Note: You are changing the dimensions alone and not is no resolution! Image with more resolution gives more space to the file size. Even if you scale the image, the resolution is the same till now. Try using image editing software to reduce the resolution to make up a smaller image size. If you lower the resolution automatically it reflects in dimensions.
We have seen the procedures for reducing the image size but you can even make the image larger by using the image scaler of cPanel. Check the preview of the images before you start working for image bigger size.
Also, keep an eye on the sharpness of images because while increasing the size automatically reduces the sharpness. Decide the image quality by previewing it before!
When changing the image from small to original dimension of course its quality get reduces. So, do a tick on "retain a copy of the old images" before you start work.
Original images are a treasure when comparing them with a new one!
You can use this tool to resize the image whenever you want. It makes your work easier and faster too! Moreover, it helps you in giving result by faster loading pages.
Let’s start the process:
Step 1: Go to cPanel and then tap on the section “File”. It shows more options such as file manager, images, FTP accounts, FTP connections, and disk usage etc.
Step 2: Now choose the option “Image” and so, you can see three interlinked words such as thumbnailer, scaler and converter.
Step 3: Fix with the scaler option to resize the image. Then, it goes directly to the list of images on the website. Tap on the file public_html and select the image where you have saved it already.
Step 4: Choose the image to resize and scale it! It clearly shows the size and dimension of the images in detail.
Further, proceed with the page controls:
Per cent, new dimensions: Here, you can add the new dimension of images. Consider it by using the measurement of a per cent as per the image originality or pixel. Change the dimension of the image and check it by opening the image.
It clearly shows the work it done for resizing the image. Once if you upload the resized image later, you can change it to the original dimensions.
Aspect ratio: To avoid distortion or stretching, don’t enable this aspect ratio.
Retaining old images: Here, it happens the overriding from the previous to the new one. In case, if you want to have the original image then kindly do it by tapping on the option to retain a copy of the old image.
Filename and path: To make sure it's an old image it would automatically add up the word “old” to the original image for your reference. It’s a default job!
Once done, you can see the button “Scale image”. Tap on that button to resize the image you have. You will get the message by saying “Images scaled successfully”.
When again you check the directory, you can see the new as well as old images with the dimensions.
Note: You are changing the dimensions alone and not is no resolution! Image with more resolution gives more space to the file size. Even if you scale the image, the resolution is the same till now. Try using image editing software to reduce the resolution to make up a smaller image size. If you lower the resolution automatically it reflects in dimensions.
We have seen the procedures for reducing the image size but you can even make the image larger by using the image scaler of cPanel. Check the preview of the images before you start working for image bigger size.
Also, keep an eye on the sharpness of images because while increasing the size automatically reduces the sharpness. Decide the image quality by previewing it before!
When changing the image from small to original dimension of course its quality get reduces. So, do a tick on "retain a copy of the old images" before you start work.
Original images are a treasure when comparing them with a new one!