You would have done the installation of cPanel! Along with the installation of cPanel, you have the advantage of using EasyApache. The feature of EasyApache includes more benefits like updating components of servers such as Apache modules and PHP versions, configures and installs automatically. cPanel has a recent activity of EasyApache 3 deprecation which leaves a pathway to get along with EasyApache3. For updating the new release, first, you need to move from EasyApache3 to EasyApache 4.
Let us use WHM (Web host manager) and CLI (Command Line Interface) for updating EasyApache3 to EasyApache 4.
Here’s a big note before you start the process of migrating EasyApache3 to EasyApache4:
EasyApache3 to EasyApache4 migration using Command Line Interface:
Step 1: Use the connection SSH as the root user for connecting to your server.
Step 2: Use the command
Step 3: The command “
Step 4: If you get the warning kindly read it thoroughly. Check if you have any option for doing it manually. Enter the button “Y” and tap on the button “Enter”.
Step 5: cPanel would start identifying the warning again for clearance. You may get an option for doing manual support. Again, type “Y” and then Enter.
Step 6: While moving from EasyApache 3 to EasyApache 4, you can view all the information regarding conversion from EA3 to EA4, you can see that mostly components are not necessary, press Y to continue.
After completion of process you will get the CLI Prompt.
Method 2: Migration from EasyApache3 to EasyApache4 using Web Host Manager:
Step 1: Check the cPanel update configuration moves to Current or Edge.
Step 2: Take the action of the root user for login to Web Host Manager. You can see the search bar present on the left side of the web host manager. Just type as easy in the search bar!
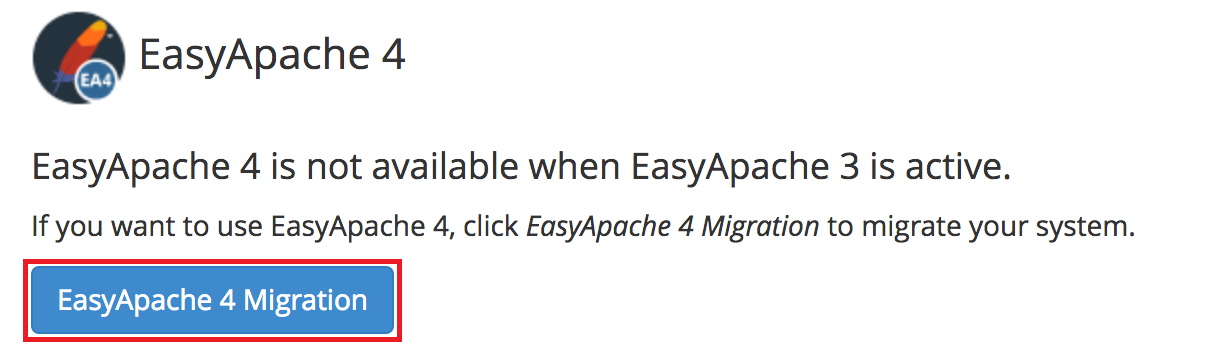
Step 3: Tap on the software to choose EasyApache4.

You will be displayed with the option to tap “EasyApache4 Migration”. Before going to the next step, just ensure that you receive any warnings now.
Step 4: Scroll down to the page for checking the button “Migrate” and then tap it for running EasyApache4.
Step 5: You will be displayed with a pop-up window by saying “Yes, run EasyApache4 Migration”.
Step 6: By now, You will receive a message stating “EasyApache 4 Migration have successfully migrated”.
Now close the tool by clicking on the button “done”.
There is frequent modification when one process changes its entire model. For example, You were changing EasyApache3 to EasyApache4. So, here takes the role of adapting EasyApache4 to the entire system right! It should match your profile manually. Whenever it starts matching the profile sometimes it leaves modules like PHP and Apache.
Do WordPress Error give you an error?
If you use WordPress, then you might receive a message stating “Your PHP installation appears to be missing the MySQL extension which is required by WordPress”
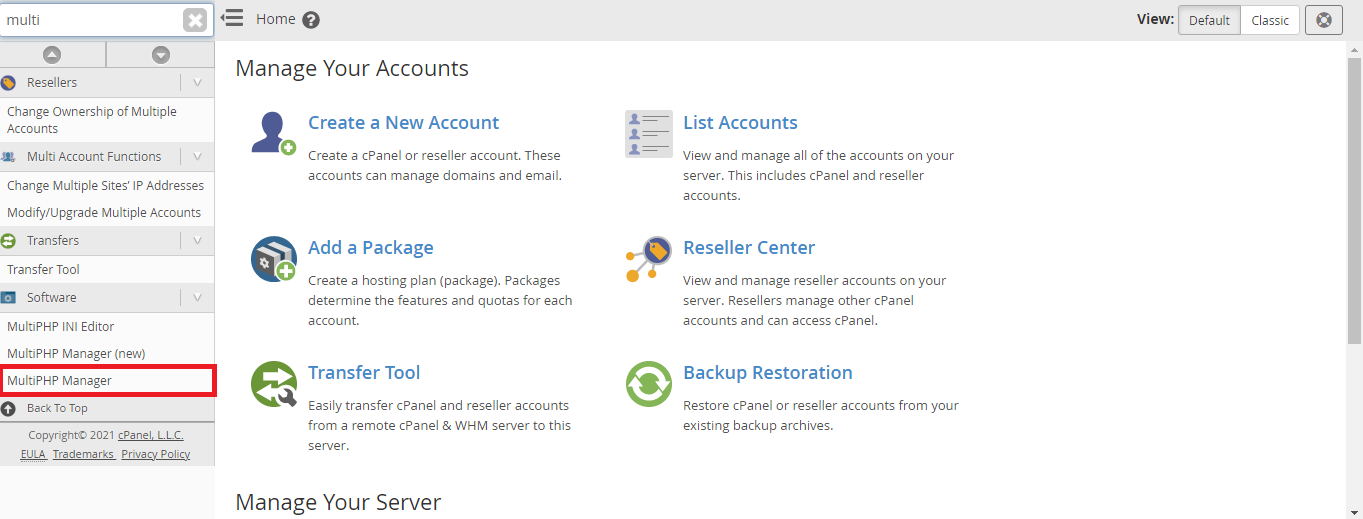
Step 1: Login into Web host manager as the root user. Search where the "MultiPHP Manager" is present. Tap on it to choose system PHP-FPM!
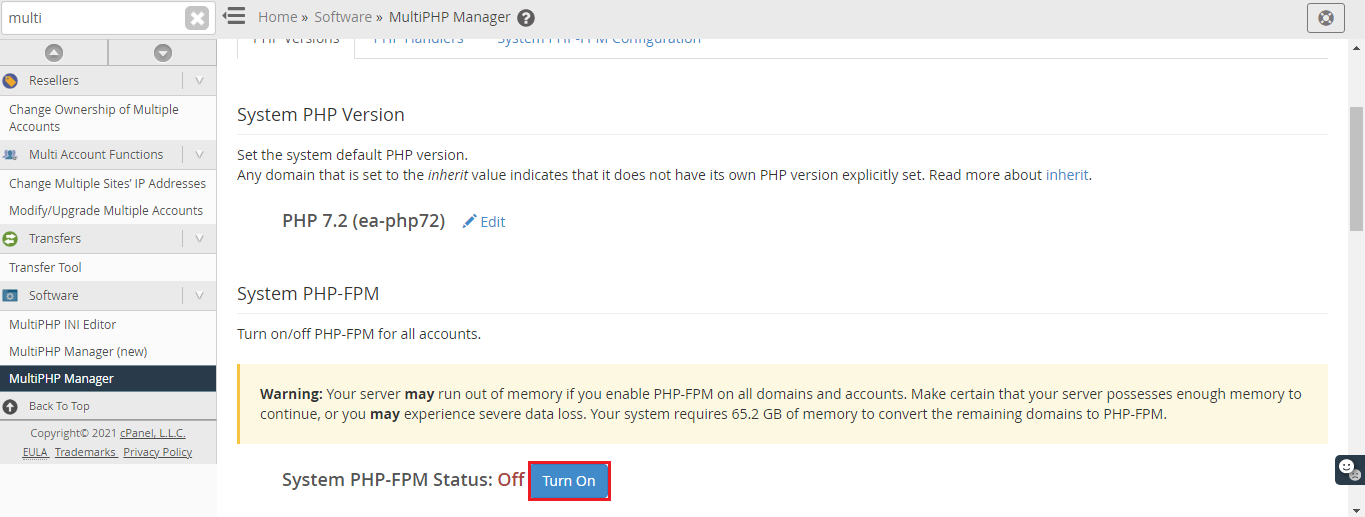
Step 2: You can see the choice under PHP versions and kindly turn off the system PHP-FPM.
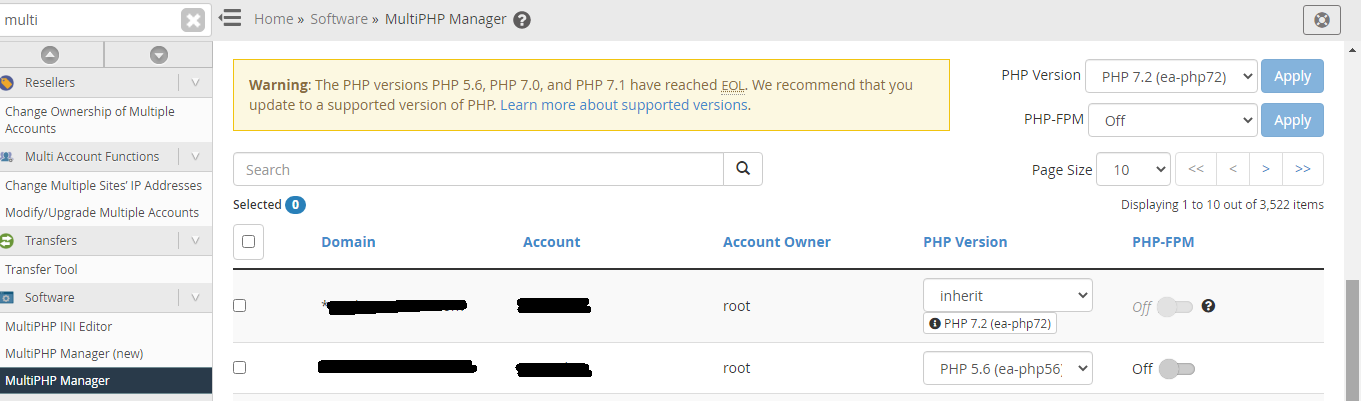
Step 3: As per your domain, choose the PHP version and that should not show you any error or warning.
Now, use SSH as root user for taking up the backup for php.ini files by using the command below:
Step 4: Now, run the below command:
Step 5: You might missed some lines in php.ini file so, to identify those lines use below command:
Step 6: Now, its time to take .htaccess file backup using below command:
Step 7: Just add below command to the file .htaccess at top:
<IfModule mod_suphp.c>
suPHP_ConfigPath /home/cpuser/public_html
</IfModule>
Step 8: Try to reload the website for overcoming no more errors.
Till now, you have seen multiple steps. It is very easy to migrate from EasyApache3 to EasyApache 4 forever. Follow our instructions correctly to get luck instantly!
Let us use WHM (Web host manager) and CLI (Command Line Interface) for updating EasyApache3 to EasyApache 4.
Here’s a big note before you start the process of migrating EasyApache3 to EasyApache4:
- It is necessary to get root access from a dedicated server or VPS.
- If you use CentOS 5 then please note that EasyApache 4 won’t be flexible to work. You must raise a server move request towards the team of technical support.
- Stop using the tool called “PHP Switcher” and then move into the version of PHP customization -
Code:
yum -y remove imh-php52 imh-php53 imh-php54 imh-php55 imh-php56 imh-php70 imh-php71 cpanel-phpconf- Go to .htaccess file to comment the tool “PHP Switcher AddHandler lines” -
Code:
for a in $(for i in $(\ls /var/cpanel/users | grep -v system); do find /home/$i -name .htaccess; done); do sed -i /AddHandler/s/^/#/ $a; done- Search for the file php.in in cPanel for backing up it and also don’t forget to disable it -
Code:
for a in $(for i in $(\ls /var/cpanel/users | grep -v system); do find /home/$i -name php.ini; done); do mv $a $a-bk; done- Again, go to .htaccess file for commenting suphp_configpath lines -
Code:
for i in $(find /home/*/ -name .htaccess); do sed -i /[Ss][Uu][Pp][Hh][Pp]/s/^/#/ $i && echo $i; doneStep 1: Use the connection SSH as the root user for connecting to your server.
Step 2: Use the command
/scripts/upcp for updating cPanel.Step 3: The command “
/usr/local/cpanel/scripts/migrate_ea3_to_ea4 –run” will be helpful for you to migrating the EasyApache3 to EasyApache4.Step 4: If you get the warning kindly read it thoroughly. Check if you have any option for doing it manually. Enter the button “Y” and tap on the button “Enter”.
Step 5: cPanel would start identifying the warning again for clearance. You may get an option for doing manual support. Again, type “Y” and then Enter.
Step 6: While moving from EasyApache 3 to EasyApache 4, you can view all the information regarding conversion from EA3 to EA4, you can see that mostly components are not necessary, press Y to continue.
After completion of process you will get the CLI Prompt.
Method 2: Migration from EasyApache3 to EasyApache4 using Web Host Manager:
Step 1: Check the cPanel update configuration moves to Current or Edge.
Step 2: Take the action of the root user for login to Web Host Manager. You can see the search bar present on the left side of the web host manager. Just type as easy in the search bar!
Step 3: Tap on the software to choose EasyApache4.
You will be displayed with the option to tap “EasyApache4 Migration”. Before going to the next step, just ensure that you receive any warnings now.
Step 4: Scroll down to the page for checking the button “Migrate” and then tap it for running EasyApache4.
Step 5: You will be displayed with a pop-up window by saying “Yes, run EasyApache4 Migration”.
Step 6: By now, You will receive a message stating “EasyApache 4 Migration have successfully migrated”.
Now close the tool by clicking on the button “done”.
There is frequent modification when one process changes its entire model. For example, You were changing EasyApache3 to EasyApache4. So, here takes the role of adapting EasyApache4 to the entire system right! It should match your profile manually. Whenever it starts matching the profile sometimes it leaves modules like PHP and Apache.
Do WordPress Error give you an error?
If you use WordPress, then you might receive a message stating “Your PHP installation appears to be missing the MySQL extension which is required by WordPress”
Step 1: Login into Web host manager as the root user. Search where the "MultiPHP Manager" is present. Tap on it to choose system PHP-FPM!
Step 2: You can see the choice under PHP versions and kindly turn off the system PHP-FPM.
Step 3: As per your domain, choose the PHP version and that should not show you any error or warning.
Now, use SSH as root user for taking up the backup for php.ini files by using the command below:
Code:
cp /home/cpuser/public_html/php.ini /home/cpuser/public_html/php.ini.bak
Code:
cp /opt/cpanel/ea-php##/root/etc/php.ini /home/cpuser/public_html/
Code:
for i in `ls /opt/cpanel/ea-php##/root/etc/php.d`; do cat /opt/cpanel/##/root/etc/php.d/$i >> /home/cpuser/public_html/php.ini; done
Code:
cp /home/cpuser/public_html/.htaccess /home/cpuser/public_html/.htaccess.bak<IfModule mod_suphp.c>
suPHP_ConfigPath /home/cpuser/public_html
</IfModule>
Step 8: Try to reload the website for overcoming no more errors.
Till now, you have seen multiple steps. It is very easy to migrate from EasyApache3 to EasyApache 4 forever. Follow our instructions correctly to get luck instantly!