Disabling Password Authorization in WHM
Through WHM or Web Host Manager, you can access the VPS administration or cPanel’s dedicated servers. With this, you can run the old server or resell the web hosting services. WHM is the cPanel’s reseller. Using cPanel, hosting accounts are managed in the server individually. WHM is flexible which allows the user in managing the account in the host or domain. You can configure the automatic or manual system backups and transfer accounts with the server, without installing the server or system. Combination of WHM and cPanel created a full features control panel system. WHM allows you to get permission to check the status or information of the server. WHM is used to create, suspend or delete your individual cPanel Accounts, manage the accounts and hosting package features, access the account of reseller without giving login details, perform basic control panel and system maintenance and change the domain name and username of the client.
In password authorization, you will use username and password to connect the server. The attackers hack the server by trying different combinations of username and password. If their guess is right, they will access the server. If you use SSH keys for connecting the server, the person with the private only has the right to access the server.
Secure Shell Protocol (SSH) is a network protocol that allows you to connect your server to another web server on the internet through CLI (Command Line Interface). This protocol is used for configuring CLI, managing your remote server and other tasks. Keys are used to increase security. Public Key and Private Key are a pair of keys available in SSH. Private Key will be in your system while public key will available in your server. When you connect your server, both the keys are compared, if the Private Key and Public Key are same, you are allowed to access the server.
SSH Keys are created using SSH Access menu in the cPanel. In the Manage SSH Section, click Generate New Key button. There you have options for generating Public Keys and Private Key. In the generate page, you have to give Key Name, Key Size, Key Type and password. After filling the details click Generate Key button. Both the keys are created now and now you can manage or authorize the keys as per your need. You can also download the key and convert it to other formats as you like.
Now you can enable the authorization based on the key and access the server using SSH key.
Step 1 – Login WHM with the provided username and password as a root user.

Step 2 – Select the Security center option in the Home page navigation menu.
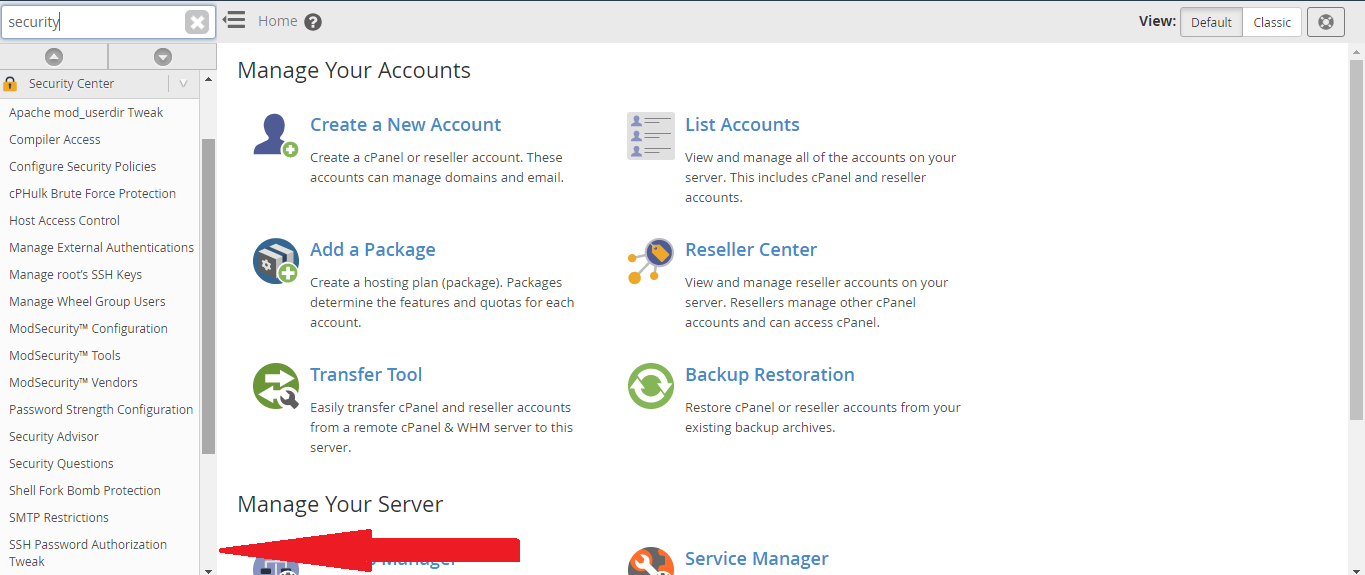
Step 3 – Under the security center option, click SSH Password Authorization Tweak button. Using this feature you can enable or disable authorization of password in SSH Authorization. When the user access the server through SSH, the system will force the users to use the Private Key and Public Key, while disabling password authorization.
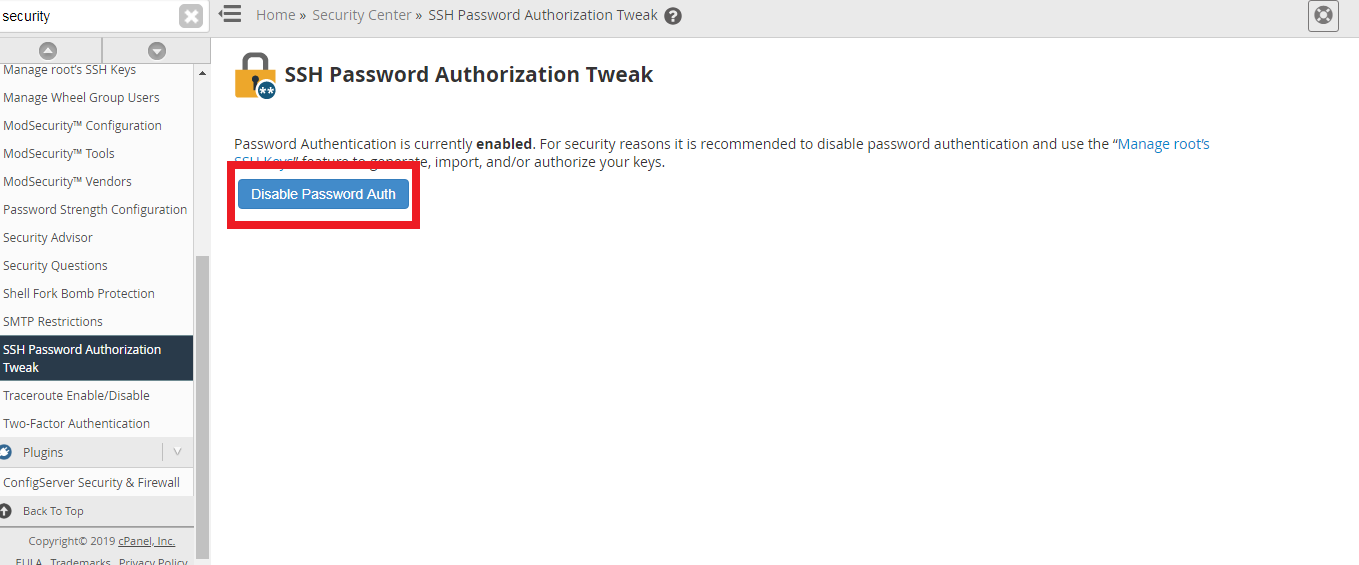
Step 4 – For disabling SSH Password Authentication, Click Disable Password Auth button. Once the disabling is done you will get a message “Password Auth has been disabled”.
Through WHM or Web Host Manager, you can access the VPS administration or cPanel’s dedicated servers. With this, you can run the old server or resell the web hosting services. WHM is the cPanel’s reseller. Using cPanel, hosting accounts are managed in the server individually. WHM is flexible which allows the user in managing the account in the host or domain. You can configure the automatic or manual system backups and transfer accounts with the server, without installing the server or system. Combination of WHM and cPanel created a full features control panel system. WHM allows you to get permission to check the status or information of the server. WHM is used to create, suspend or delete your individual cPanel Accounts, manage the accounts and hosting package features, access the account of reseller without giving login details, perform basic control panel and system maintenance and change the domain name and username of the client.
In password authorization, you will use username and password to connect the server. The attackers hack the server by trying different combinations of username and password. If their guess is right, they will access the server. If you use SSH keys for connecting the server, the person with the private only has the right to access the server.
Secure Shell Protocol (SSH) is a network protocol that allows you to connect your server to another web server on the internet through CLI (Command Line Interface). This protocol is used for configuring CLI, managing your remote server and other tasks. Keys are used to increase security. Public Key and Private Key are a pair of keys available in SSH. Private Key will be in your system while public key will available in your server. When you connect your server, both the keys are compared, if the Private Key and Public Key are same, you are allowed to access the server.
SSH Keys are created using SSH Access menu in the cPanel. In the Manage SSH Section, click Generate New Key button. There you have options for generating Public Keys and Private Key. In the generate page, you have to give Key Name, Key Size, Key Type and password. After filling the details click Generate Key button. Both the keys are created now and now you can manage or authorize the keys as per your need. You can also download the key and convert it to other formats as you like.
Now you can enable the authorization based on the key and access the server using SSH key.
Step 1 – Login WHM with the provided username and password as a root user.
Step 2 – Select the Security center option in the Home page navigation menu.
Step 3 – Under the security center option, click SSH Password Authorization Tweak button. Using this feature you can enable or disable authorization of password in SSH Authorization. When the user access the server through SSH, the system will force the users to use the Private Key and Public Key, while disabling password authorization.
Step 4 – For disabling SSH Password Authentication, Click Disable Password Auth button. Once the disabling is done you will get a message “Password Auth has been disabled”.