When you look at best social media websites like Facebook, Twitter, or Instagram, it’s easy to think that creating such a website will require tremendous amount of coding and manpower. And to some extent, that’s true. But what if you build such a website on WordPress? It’s quite a possibility and many people have actually built their own social media websites without any coding whatsoever. You’d only need to install a plug-in called BuddyPress for this.
What is BuddyPress and what can I do with it?
As already mentioned, BuddyPress is a WordPress plugin that you can install and use. Plugins are third-party software that help enhance the functionalities of WordPress. You can install them from the WordPress plugin directory. BuddyPress is free and open-source. Hence you do not have to pay anything to use it.
With BuddyPress installed on your WP website, your visitors can do so much more than simply scrolling through static web pages. They can:
Create a Social Media Website using BuddyPress
Now that you know what BuddyPress is and what it can do for you, it’s time to start building a social media website from scratch. Here are the steps involved:
Get a Hosting
If you haven’t already, you’d need a good hosting provider where you can store your social media website. So get a hosting first.
Secure a domain name
Next, you’d need a domain. This is your website address. It’s a good practice to buy a short, memorable domain name, (like Google, Yahoo, Facebook – all of which are easy to memorize)
Install an Attractive WP Theme
Your social website needs a good look and feel. This is offered by a WordPress theme. There are both free and paid themes available. To install a theme, you need to log in to your WordPress dashboard and then visit the Appearance >> Theme section. You can search for “Social Media” to filter the themes that are note intended for social media websites. Install the theme that matches your preference.
Install the BuddyPress plugin
Next thing you’d need to do is install the BuddyPress plugin for your website. Follow the steps below:
Now that the plugin is installed, you can start creating your Facebook-style social media website. Before that, you need to make some necessary changes. In other words, configure the plugin. For this, follow the below steps:
Account Settings – This will enable the users to change their account from profile screen.
Friend Connections – This functionality will allow users to send a request to other users present within the network.
Private Messaging – This will allow private message exchange between the users.
Notifications – With this feature enabled, users will receive a email notification when they receive a friend request or message.
There are many more such components you can enable or disable. Once finished, you can save the changes made and your social media website will be live.
What is BuddyPress and what can I do with it?
As already mentioned, BuddyPress is a WordPress plugin that you can install and use. Plugins are third-party software that help enhance the functionalities of WordPress. You can install them from the WordPress plugin directory. BuddyPress is free and open-source. Hence you do not have to pay anything to use it.
With BuddyPress installed on your WP website, your visitors can do so much more than simply scrolling through static web pages. They can:
- Create their own profiles.
- Upload and share images.
- Connect with other users.
- Exchange private messages and multimedia like pictures, video, audio files.
- Create and join groups
- Create blogs and publish them
- Can like others’ post and comment on them
Create a Social Media Website using BuddyPress
Now that you know what BuddyPress is and what it can do for you, it’s time to start building a social media website from scratch. Here are the steps involved:
Get a Hosting
If you haven’t already, you’d need a good hosting provider where you can store your social media website. So get a hosting first.
Secure a domain name
Next, you’d need a domain. This is your website address. It’s a good practice to buy a short, memorable domain name, (like Google, Yahoo, Facebook – all of which are easy to memorize)
Install an Attractive WP Theme
Your social website needs a good look and feel. This is offered by a WordPress theme. There are both free and paid themes available. To install a theme, you need to log in to your WordPress dashboard and then visit the Appearance >> Theme section. You can search for “Social Media” to filter the themes that are note intended for social media websites. Install the theme that matches your preference.
Install the BuddyPress plugin
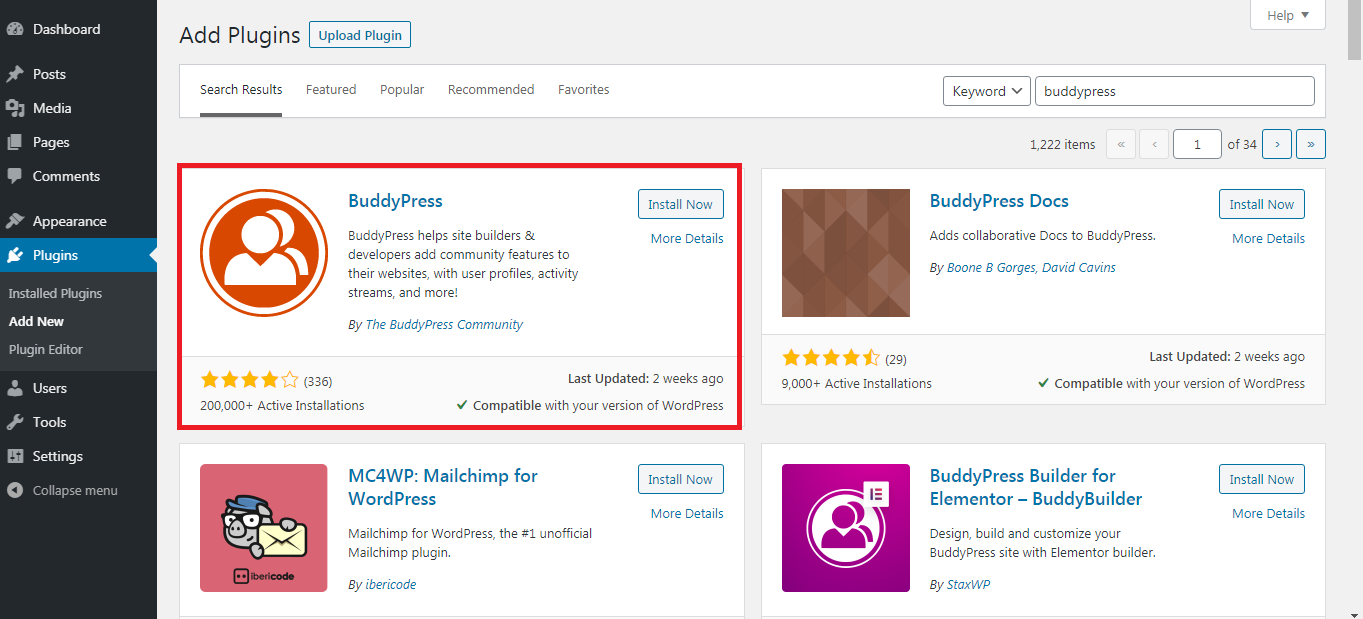
Next thing you’d need to do is install the BuddyPress plugin for your website. Follow the steps below:
- Log in to WP dashboard and look for the “Plugins” section and click on it.
- Select “Add New”
- Search “BuddyPress”
- Install the plugin by clicking on the “Install Now” button
- Post installation, click on the “Activate” button to initiate the BuddyPress plugin.
Now that the plugin is installed, you can start creating your Facebook-style social media website. Before that, you need to make some necessary changes. In other words, configure the plugin. For this, follow the below steps:
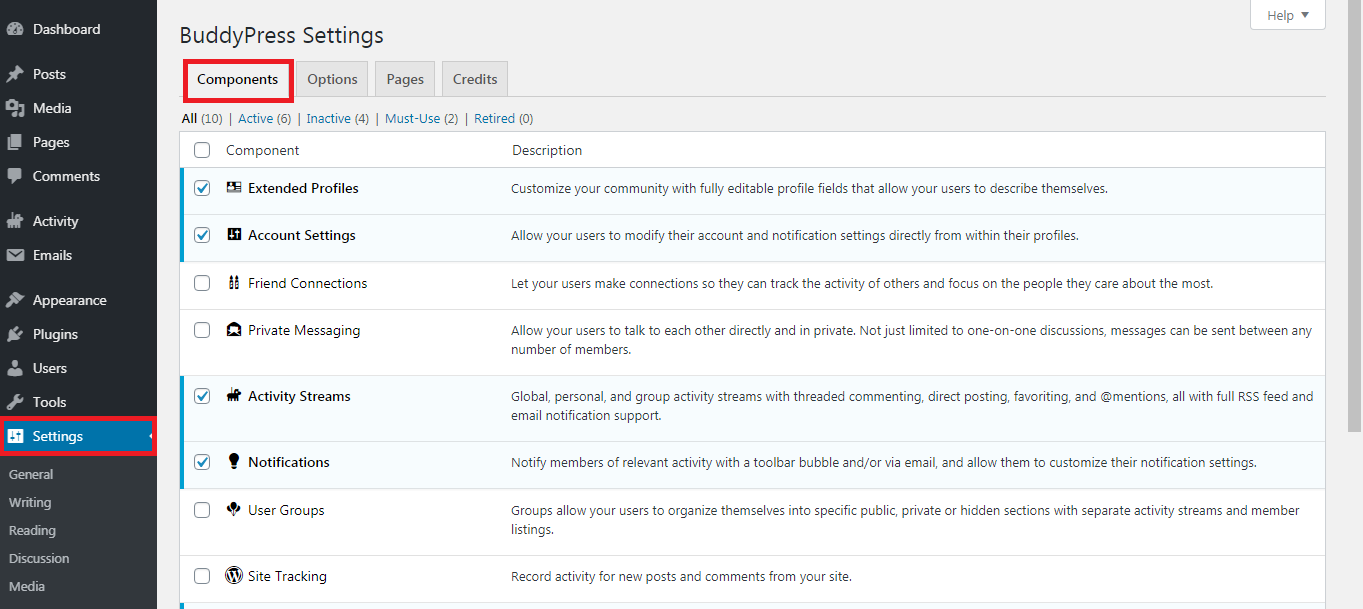
- Navigate to Plugins >> Installed Plugins >> BuddyPress >> Settings >> Components.
- You’ll see options like Extended Profiles, Friend Connection, Notification among other components. Here’s what some of them mean:
Account Settings – This will enable the users to change their account from profile screen.
Friend Connections – This functionality will allow users to send a request to other users present within the network.
Private Messaging – This will allow private message exchange between the users.
Notifications – With this feature enabled, users will receive a email notification when they receive a friend request or message.
There are many more such components you can enable or disable. Once finished, you can save the changes made and your social media website will be live.