A quick jump into AWS EC2 features – Overview:
Elastic Compute Cloud in a short form known as EC2. You would have launched instances in your operating system, but have you ever wondered, how it process? Using the viral compute, you can use interfaces of web service to launch instances. Before a start, your customer should be convinced to use web service interfaces. It is easy for adding images and well coming to network configuration, it’s a new ethic. We can give you a fine example of cloud computing in Amazon. What shall we do with EC2 here? You have more numbers of features like deletion, creating automatic backups, AMIs backups, and VMs creation, etc. Here’s a wide list:
EC2 Creation:
Moreover, it is a very simple process for EC2 creation. You just need to launch the machine by clicking select continuously.
Follow the below-mentioned steps:
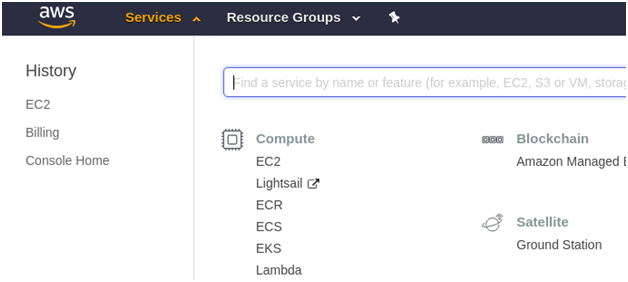
Step 1: First proceed with AWS console login and go to compute service for selecting EC2.
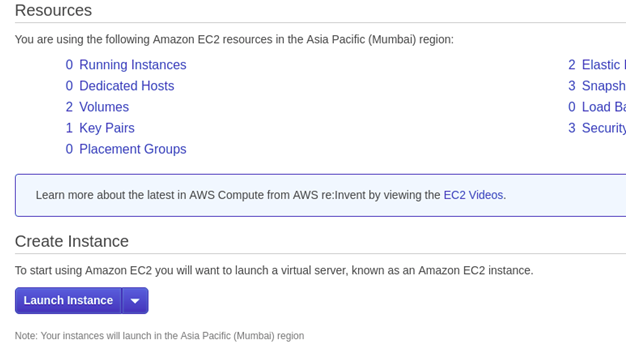
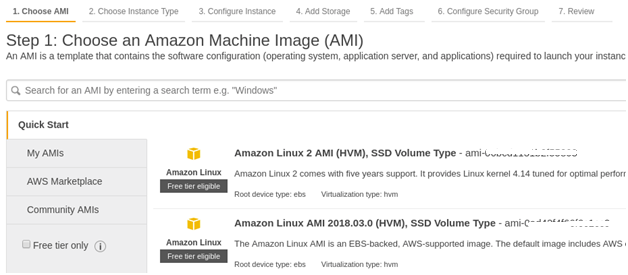
Step 2: On the EC2 console page, you can see the button called “Launch instance”. There are multiple types of images found in the market place of AWS. Before going to the next step kindly choose AMI.
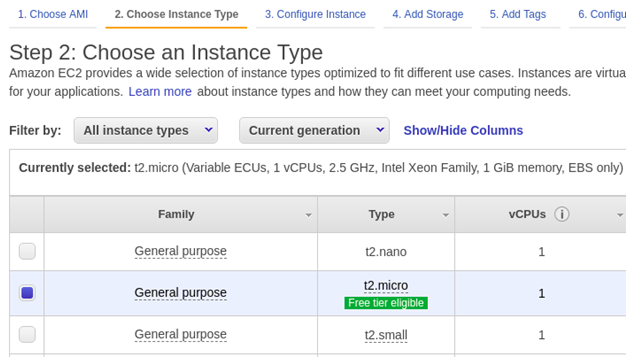
Step 3: Here, you need to choose the type of instances. Based upon the size and requirement of performance you can choose the instance type. But make sure before choosing the right one!
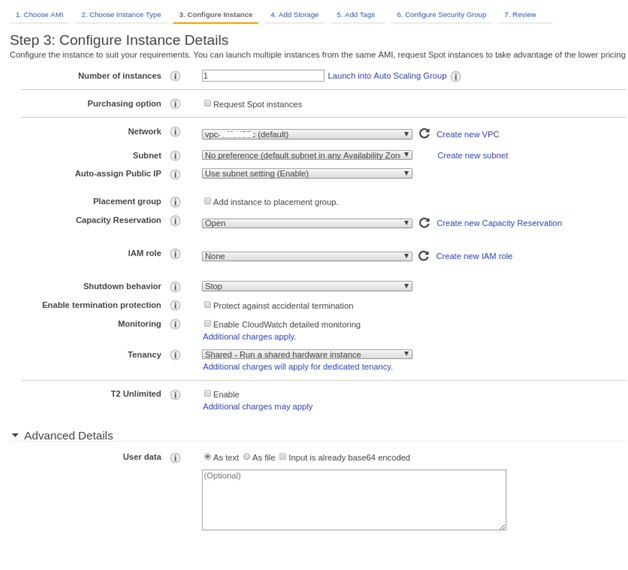
Step 4: Configuration of instances takes here. You need to enter all the details of instances step by step. Whenever you launch EC2, it is necessary to select configuration and AMI with a count of instances in number. If you want to connect VPC then start adding it in this step without fail. If you don’t want to access the public network kindly ignore it by disabling the VPC selected over here.
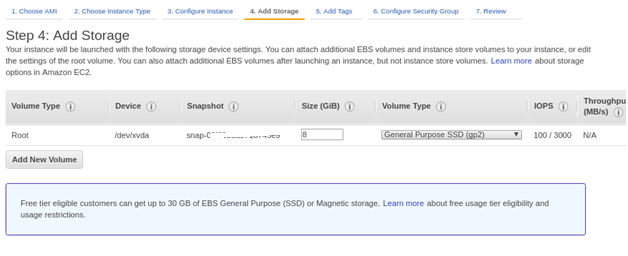
Step 5: Storage plays a very important role here. To expand your disk chooses magnetic/SSD/select for increasing the space. Sometimes, you would be under pressure to separate the disk from the application of MySQL. You can add the drive in this step.
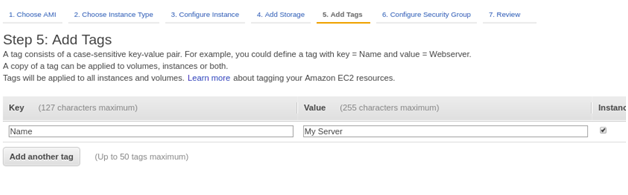
Step 6: TAG helps to identify your process. If you are not interested kindly ignore it!
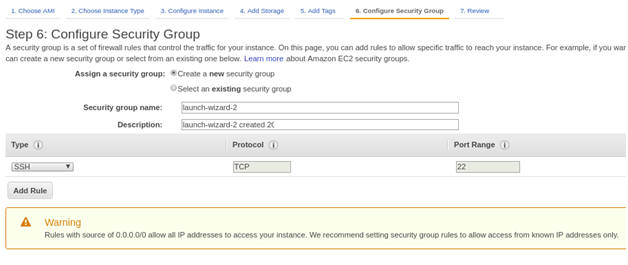
Step 7: Protection for your instances is very important here. A security group allows ports for getting traffic at regular intervals. It’s your choice to use the old security group or a new one based on the requirement.
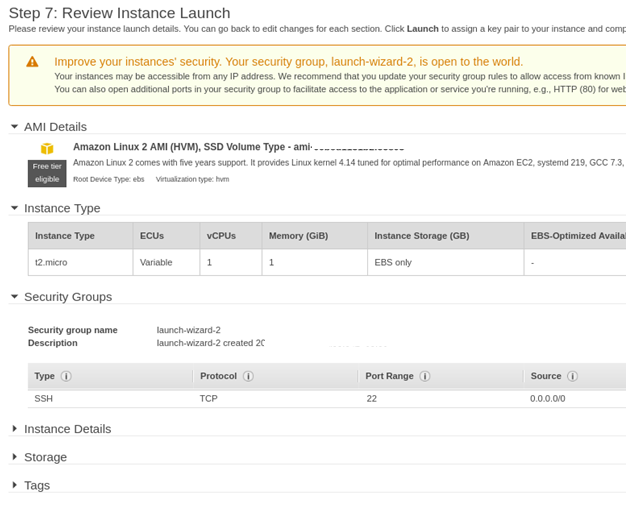
Step 8: Have a look at the launch of the instance carefully! Launch the instances under review!
Snapshot & Volume:
Snapshot is your EBS backup. Take the creation of EBS from the EC2 console. From your EC2 console go to volumes and then click on actions. Tap on the option to create a snapshot.
Volume: EC2 disk attachment is known as volume. It is possible to add more EBS to your Ec2.
AWS CLI:
AWS CLI is a command-line tool.
Terminate/ Start/ Stop instances:
Go to the AWS console and then choose the action that you need like start, stop and terminate. Choose the instances and then tap on the action for selecting the state of instances.
Copy AMI to any region:
You can copy AMI from one to another region simultaneously it is possible to change infrastructure from one to another region.
As usual, copies the AMI created and paste it to another region.

Go to the section of AMI created and then select the AMI you want to copy. Tap on the action and then copy the AMI. Choose the region where you have the paste the copied AMI. Don’t forget to add the description and name. Just tap on the copy button.
AMI automated creation:
Just automate the AMI created in the above step.
Machine image – AMI:
A machine image is a backup for your Amazon EC2. AMI is nothing but an Amazon machine image as said it is easy to launch instances along with the AMI created newly. For recovering the disasters that occurred in your machine, use AMI for retrieving it. You can set AMI as the backup for the machine in any case. It is easy to create AMI in EC2 instances:

Step 1: From your EC2 console, go to instance for creating AMI.
Step 2: Choose an action and then images for creating images.
Step 3: Don’t forget to add a description and name for the created image.
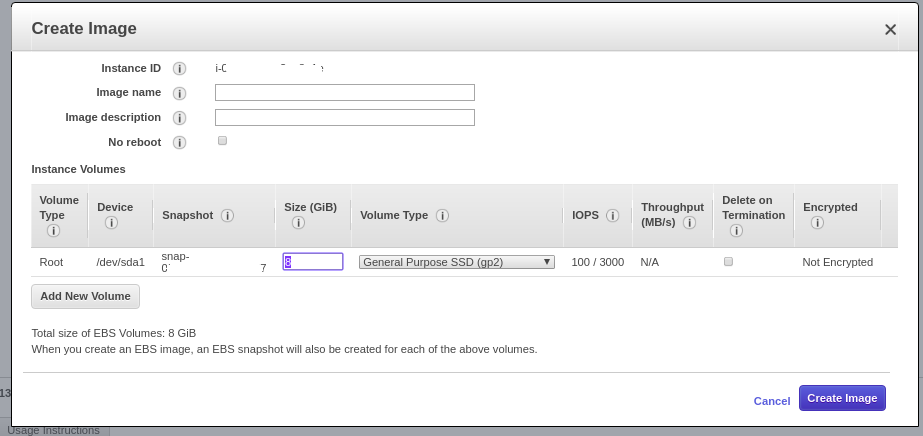
Here, you should click on no reboot, or else it would start rebooting the machine while you working on AMI creation.
Elastic IP address:
To your EC2 instances, it is easy to call the IP address that works dedicative. The IP address will attach to your machine by launching the instance which has the IP address enabled in public. Ensure that the IP address that made public will change whenever you reboot the machine. Only the public IP address should be changed not a private IP address.
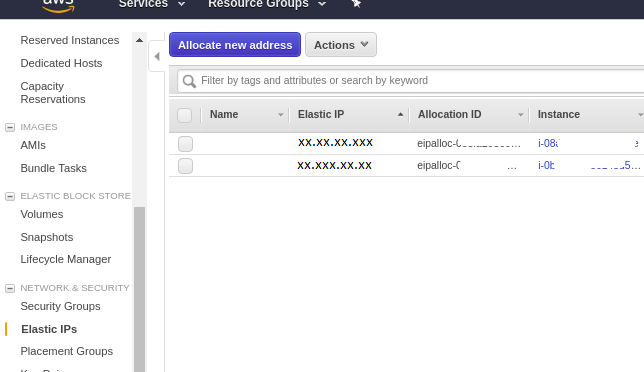
Step 1: From your console of EC2, tap on the Elastic IPs and then choose the security tab and network you like to work.
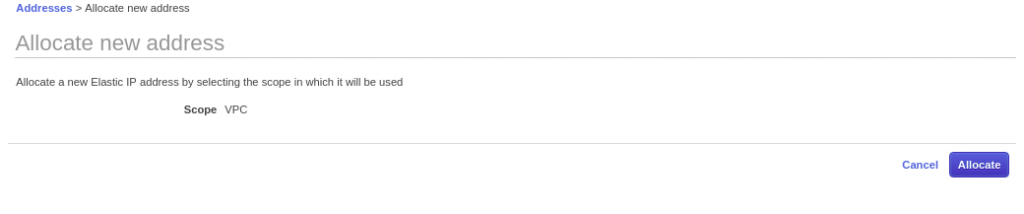
Step 2: The session takes a wide look at assigning and allotting IP address. Tap on the button “Allocate new address” for creating a new allocation. That’s it!
Cost:
AWS in service has a variety of prices and types. Whenever you design the infrastructure, it is a must to know the cost. Cost range, we have already discussed.
Elastic Block Store:
A disk type of attachment to your EC2 is known as Amazon EBS. You can attach it to already created EC2 instances. Use Linux command for mounting the interface of the command line. It is easy to create one-click for creating EBS. Go to console and then choose Elastic block store for selecting volumes. Here, you can create the EBS volume based on the requirement.
VPC / Network:
This part takes more pride in AWS also VPC is nothing but a virtual private cloud. With the help of gateway, route tables, subnet using the same network it is possible to create a network in private. Also, when it comes to subnets like public and private of course it is easy to create. In one word, you can say like for protection and privacy VPC plays the main role. To design or setup, the infrastructure Amazon VPC plays the main role. To avoid attacks that happen unwontedly VPC is a wise choice forever. Using your VPC is configured for delivering high-level security for the infrastructure.
Zones available and regions:
In worldwide, Amazon Ec2 is launched widely. Here, we are talking about the locations used in launching Amazon EC2. We split the locations into zones and regions by considering them in geographic areas. We again split the locations which are isolated is known as availability zones. Moreover, using Amazon EC2 you are eligible to use data’s in more locations, instances, and resource usage. If you work specifically on resource replication then it is an easy task to allocate. Just by specifying the zones available, you can launch the instances. Before this, make sure that you know everything about zones available and AWS. Amazon ideology is different from others so read it thoroughly. Types of instances:
Depending upon the cost, the types of instances are available in the range. Before setting up the infrastructure or launching the machines kindly go through the types of instances that should be managed with your machine. Here, RAM and VCPU play the main role in execution. Also, check your consumption usage in resources for selecting the type of instances. Gbps (Network performance), Mbps (Dedicated EBS Bandwidth) are the most used associated features in EC2.
EC2 Instance types:
Go check with the link for knowing the types of instances available in the infrastructure. From this, you can gain the real cost of instances in a detailed analysis. Your responsibility is to stop the instances which are unwanted such as QA. If you find it's idle and no process for work or test then delete it without hesitation. If you need to make an unwanted instance as a wanted instance then you can use the AWS CLI command to start the process. Make sure the instances are effective in cost and try to deal with the best action.
Security groups:
Security is a must in all mechanisms right! In that case, a security group helps to maintain your security at all instances without fail. You can also mean security group as firewall where you can create security group as new or use old one created already. Whenever you try to launch the machine, you are free to create security groups newly. Using the VPC created before, you can create the security groups also there is not any restriction for adding the security groups into EC2. Some would say that you need to get in touch with the security group port for using services listen. No, it’s not true! You can see more choices of the port like POP3, DNS, httpd, UDP/TCP, and MySQL.

Key pairs:
It can be used as public and private key pairs. It is a must to have key pairs for launching the instance. It is your choice to create a key pair newly so that the download of the key pair will be taken care of by the public key at this stage. As a default user, the private key will add to keys that are authorized in nature. Using the AWS management console, you can create or delete or import the key pairs of your choice. The main role for creating a key in AWS management console.
That’s it! You would now have an overall look at AWS EC2 features. I Hope, you would access it more!
Elastic Compute Cloud in a short form known as EC2. You would have launched instances in your operating system, but have you ever wondered, how it process? Using the viral compute, you can use interfaces of web service to launch instances. Before a start, your customer should be convinced to use web service interfaces. It is easy for adding images and well coming to network configuration, it’s a new ethic. We can give you a fine example of cloud computing in Amazon. What shall we do with EC2 here? You have more numbers of features like deletion, creating automatic backups, AMIs backups, and VMs creation, etc. Here’s a wide list:
- EC2 Creation
- Snapshot & Volume
- AWS CLI
- Terminate / Stop / Start EC2 instances.
- Copy AMI to another region
- Automate AMI creation
- AMI – Machine Image
- EIP – Elastic IP Address
- Cost
- EBS
- VPC/Network
- Zones and Region
- Types of instances
- Security group
- Key pairs
EC2 Creation:
Moreover, it is a very simple process for EC2 creation. You just need to launch the machine by clicking select continuously.
Follow the below-mentioned steps:
Step 1: First proceed with AWS console login and go to compute service for selecting EC2.
Step 2: On the EC2 console page, you can see the button called “Launch instance”. There are multiple types of images found in the market place of AWS. Before going to the next step kindly choose AMI.
Step 3: Here, you need to choose the type of instances. Based upon the size and requirement of performance you can choose the instance type. But make sure before choosing the right one!
Step 4: Configuration of instances takes here. You need to enter all the details of instances step by step. Whenever you launch EC2, it is necessary to select configuration and AMI with a count of instances in number. If you want to connect VPC then start adding it in this step without fail. If you don’t want to access the public network kindly ignore it by disabling the VPC selected over here.
Step 5: Storage plays a very important role here. To expand your disk chooses magnetic/SSD/select for increasing the space. Sometimes, you would be under pressure to separate the disk from the application of MySQL. You can add the drive in this step.
Step 6: TAG helps to identify your process. If you are not interested kindly ignore it!
Step 7: Protection for your instances is very important here. A security group allows ports for getting traffic at regular intervals. It’s your choice to use the old security group or a new one based on the requirement.
Step 8: Have a look at the launch of the instance carefully! Launch the instances under review!
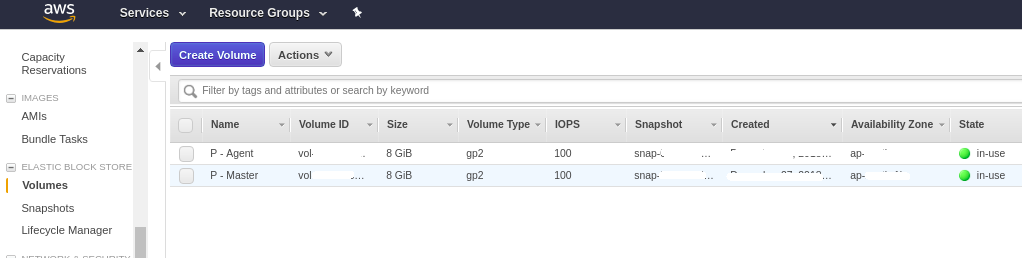
Snapshot & Volume:
Snapshot is your EBS backup. Take the creation of EBS from the EC2 console. From your EC2 console go to volumes and then click on actions. Tap on the option to create a snapshot.
Volume: EC2 disk attachment is known as volume. It is possible to add more EBS to your Ec2.
AWS CLI:
AWS CLI is a command-line tool.
Terminate/ Start/ Stop instances:
Go to the AWS console and then choose the action that you need like start, stop and terminate. Choose the instances and then tap on the action for selecting the state of instances.
Copy AMI to any region:
You can copy AMI from one to another region simultaneously it is possible to change infrastructure from one to another region.
As usual, copies the AMI created and paste it to another region.
Go to the section of AMI created and then select the AMI you want to copy. Tap on the action and then copy the AMI. Choose the region where you have the paste the copied AMI. Don’t forget to add the description and name. Just tap on the copy button.
AMI automated creation:
Just automate the AMI created in the above step.
Machine image – AMI:
A machine image is a backup for your Amazon EC2. AMI is nothing but an Amazon machine image as said it is easy to launch instances along with the AMI created newly. For recovering the disasters that occurred in your machine, use AMI for retrieving it. You can set AMI as the backup for the machine in any case. It is easy to create AMI in EC2 instances:
Step 1: From your EC2 console, go to instance for creating AMI.
Step 2: Choose an action and then images for creating images.
Step 3: Don’t forget to add a description and name for the created image.
Here, you should click on no reboot, or else it would start rebooting the machine while you working on AMI creation.
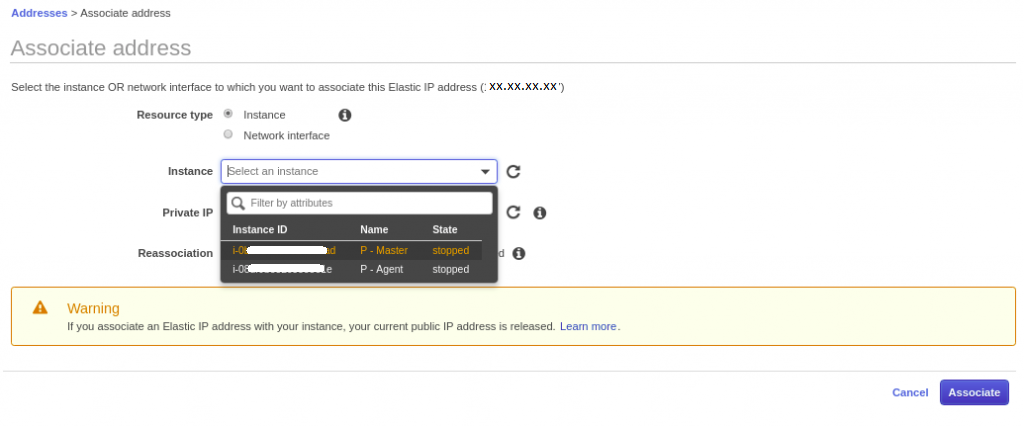
Elastic IP address:
To your EC2 instances, it is easy to call the IP address that works dedicative. The IP address will attach to your machine by launching the instance which has the IP address enabled in public. Ensure that the IP address that made public will change whenever you reboot the machine. Only the public IP address should be changed not a private IP address.
Step 1: From your console of EC2, tap on the Elastic IPs and then choose the security tab and network you like to work.
Step 2: The session takes a wide look at assigning and allotting IP address. Tap on the button “Allocate new address” for creating a new allocation. That’s it!
Cost:
AWS in service has a variety of prices and types. Whenever you design the infrastructure, it is a must to know the cost. Cost range, we have already discussed.
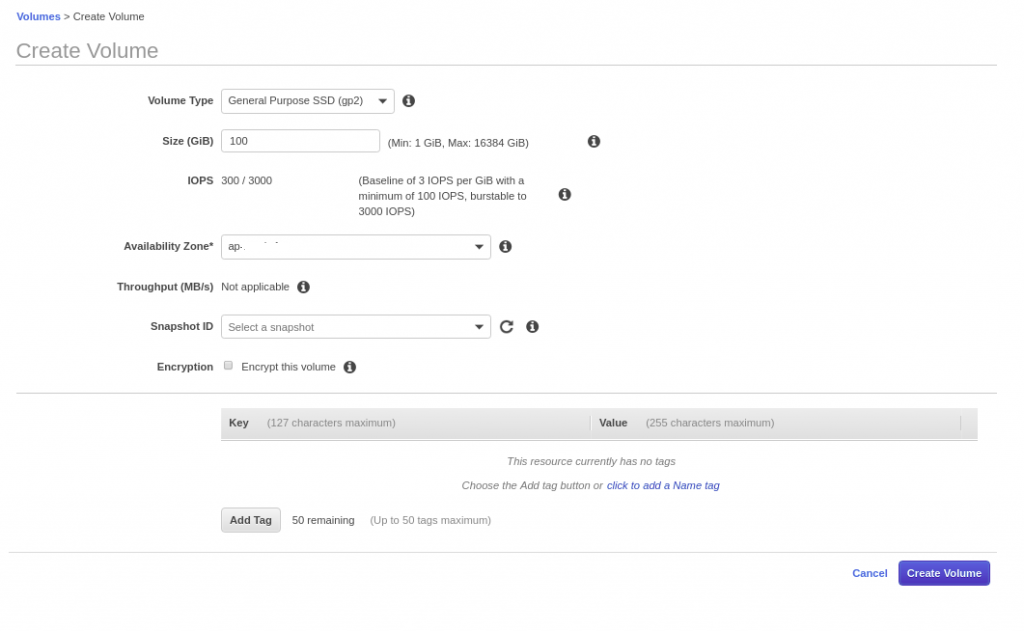
Elastic Block Store:
A disk type of attachment to your EC2 is known as Amazon EBS. You can attach it to already created EC2 instances. Use Linux command for mounting the interface of the command line. It is easy to create one-click for creating EBS. Go to console and then choose Elastic block store for selecting volumes. Here, you can create the EBS volume based on the requirement.
VPC / Network:
This part takes more pride in AWS also VPC is nothing but a virtual private cloud. With the help of gateway, route tables, subnet using the same network it is possible to create a network in private. Also, when it comes to subnets like public and private of course it is easy to create. In one word, you can say like for protection and privacy VPC plays the main role. To design or setup, the infrastructure Amazon VPC plays the main role. To avoid attacks that happen unwontedly VPC is a wise choice forever. Using your VPC is configured for delivering high-level security for the infrastructure.
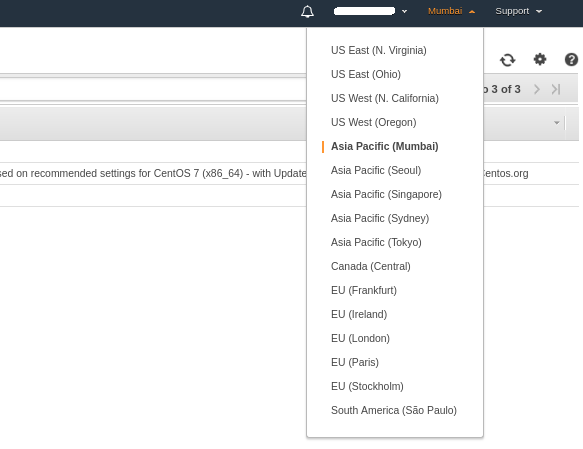
Zones available and regions:
In worldwide, Amazon Ec2 is launched widely. Here, we are talking about the locations used in launching Amazon EC2. We split the locations into zones and regions by considering them in geographic areas. We again split the locations which are isolated is known as availability zones. Moreover, using Amazon EC2 you are eligible to use data’s in more locations, instances, and resource usage. If you work specifically on resource replication then it is an easy task to allocate. Just by specifying the zones available, you can launch the instances. Before this, make sure that you know everything about zones available and AWS. Amazon ideology is different from others so read it thoroughly. Types of instances:
Depending upon the cost, the types of instances are available in the range. Before setting up the infrastructure or launching the machines kindly go through the types of instances that should be managed with your machine. Here, RAM and VCPU play the main role in execution. Also, check your consumption usage in resources for selecting the type of instances. Gbps (Network performance), Mbps (Dedicated EBS Bandwidth) are the most used associated features in EC2.
EC2 Instance types:
Go check with the link for knowing the types of instances available in the infrastructure. From this, you can gain the real cost of instances in a detailed analysis. Your responsibility is to stop the instances which are unwanted such as QA. If you find it's idle and no process for work or test then delete it without hesitation. If you need to make an unwanted instance as a wanted instance then you can use the AWS CLI command to start the process. Make sure the instances are effective in cost and try to deal with the best action.
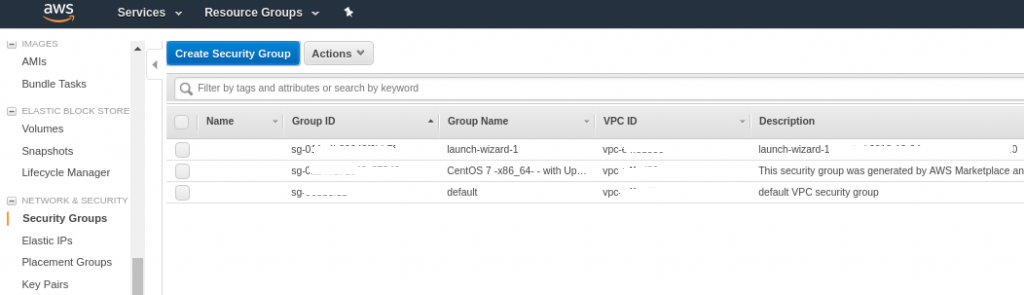
Security groups:
Security is a must in all mechanisms right! In that case, a security group helps to maintain your security at all instances without fail. You can also mean security group as firewall where you can create security group as new or use old one created already. Whenever you try to launch the machine, you are free to create security groups newly. Using the VPC created before, you can create the security groups also there is not any restriction for adding the security groups into EC2. Some would say that you need to get in touch with the security group port for using services listen. No, it’s not true! You can see more choices of the port like POP3, DNS, httpd, UDP/TCP, and MySQL.
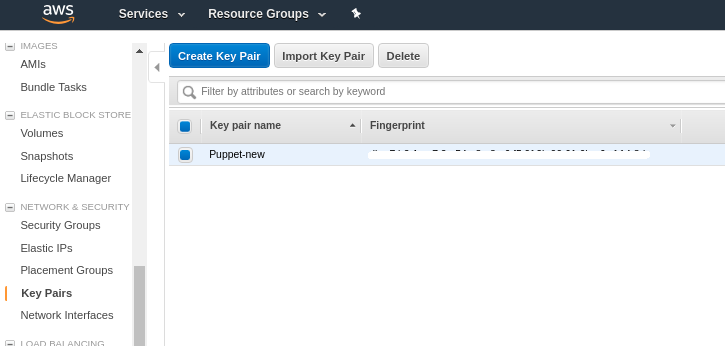
Key pairs:
It can be used as public and private key pairs. It is a must to have key pairs for launching the instance. It is your choice to create a key pair newly so that the download of the key pair will be taken care of by the public key at this stage. As a default user, the private key will add to keys that are authorized in nature. Using the AWS management console, you can create or delete or import the key pairs of your choice. The main role for creating a key in AWS management console.
That’s it! You would now have an overall look at AWS EC2 features. I Hope, you would access it more!