Steps to resolve error "Sender verify failed" in WHM
Emails – One of the most popular communication applications. Each and every business conversations and file transfers will be followed by using emails. Often, you will get few emails in spam box. Spammers used to send whole lot of messages at a time for all users. To avoid spamming and spammers, sender of the email has to verify. This article is about verification of sender email address.
“550” verification failed:
This is an SMTP message received when you send a message in email. If the sender email haven’t recognized in cPanel then you will be getting this message. There is another situation where few users are not getting the email from certain accounts.
How to resolve this 550 verification failed in EXIM?
It’s all because of only three words ‘Sender verification callouts’. To spamming as inbound mechanism, the mail server creates a term called sender verification callouts. Spammers are the one who sends you spam messages often. When you get a spam message the emails are verified by the section MAIL FROM.
Email verification:
Each email is verified by sending a command along with the sender email address + ‘RCPT TO’. Once if the mail server accepts the command then the sender email address is confirmed.
EXIM will be adjoining with send email address mail exchanger. While this process occurs then sender email address will be verified. If it doesn’t get verified then certain emails from that account will be ignored. This can be solved by just following the below steps one by one:
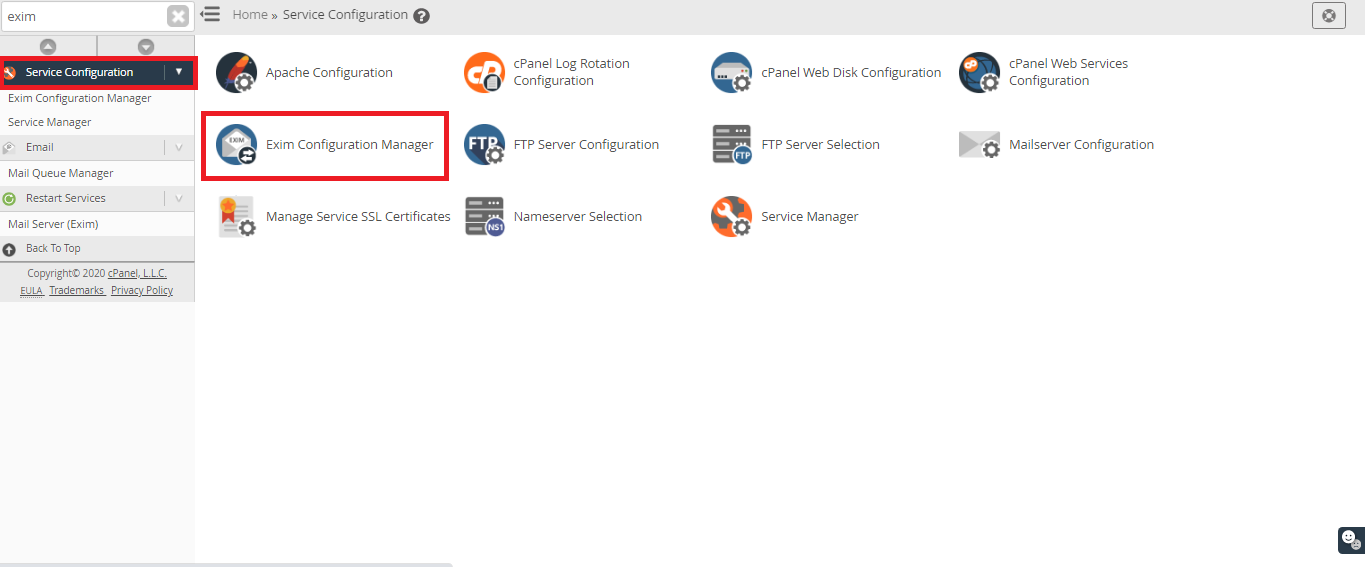
Step 1: Use your username and password to login in WHM. Choose Exim configuration manager by selecting service configuration option.
Step 2: In exim configuration manger, you can see four tabs such as basic editor, advanced editor, backup, restore and reset.
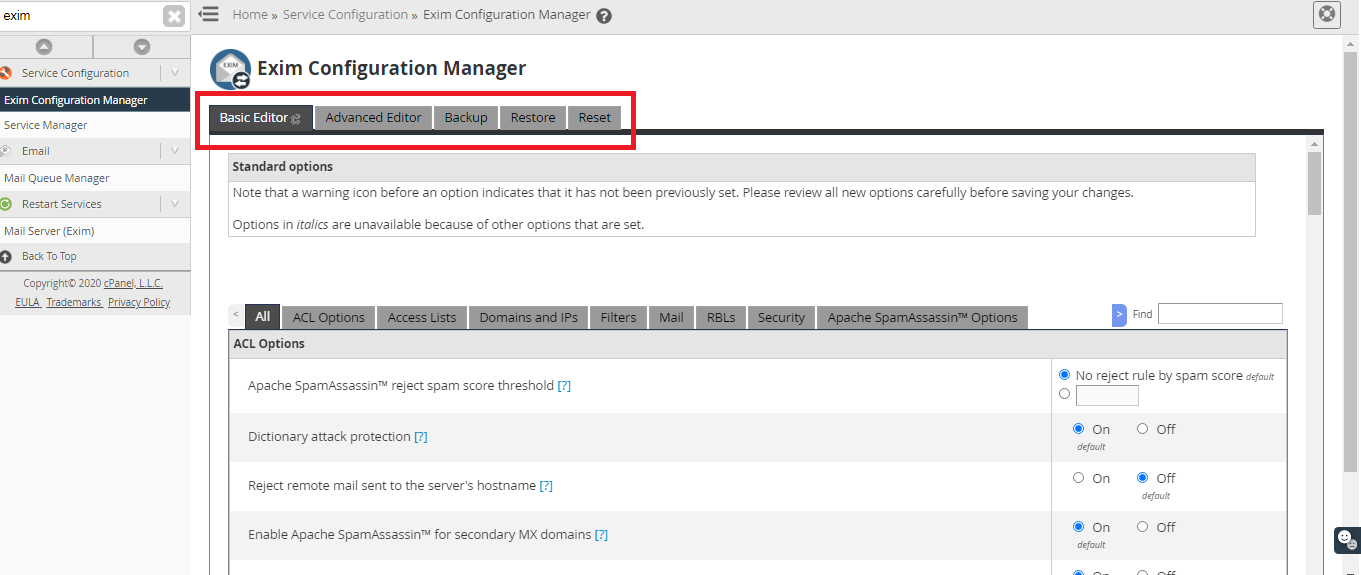
Step 3: Select the tab basic editor, and again you will get 9 tabs such as all, ACL options, Access lists, domains & IPs, filters, mail, RBLs, security and Apache SpamAssassainTMoption.
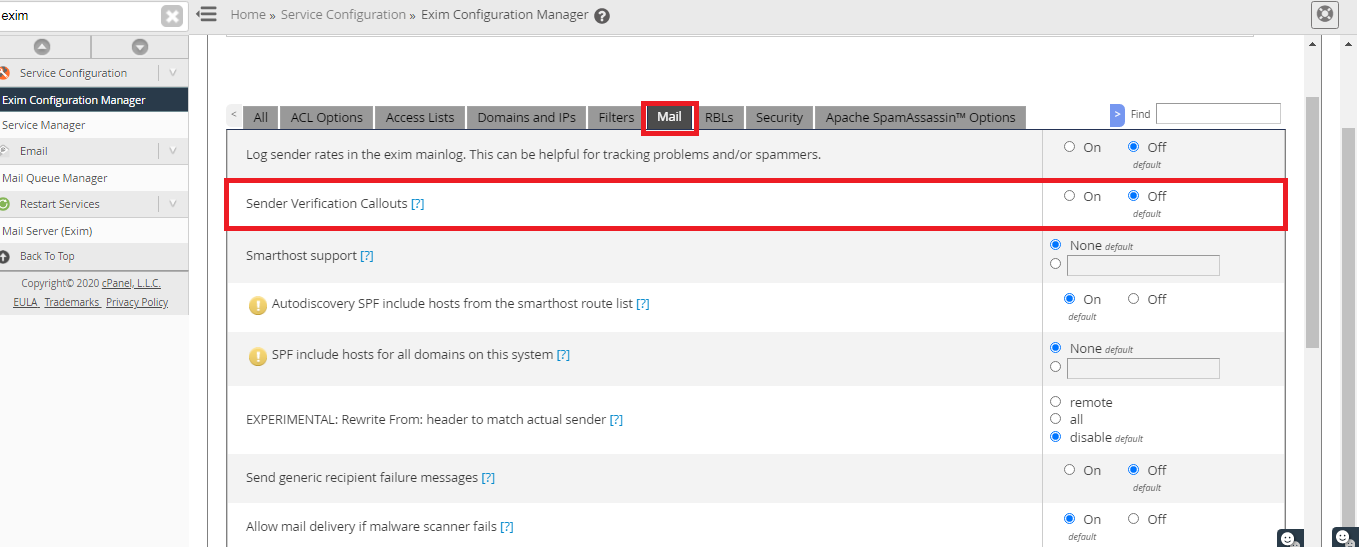
Step 4: Select the mail tab, check the first option Sender verification callouts is on or off. Set it as off and then finally click on save button.
It’s not a vague task to verify sender of emails. Follow the steps and make it easy to access.
Emails – One of the most popular communication applications. Each and every business conversations and file transfers will be followed by using emails. Often, you will get few emails in spam box. Spammers used to send whole lot of messages at a time for all users. To avoid spamming and spammers, sender of the email has to verify. This article is about verification of sender email address.
“550” verification failed:
This is an SMTP message received when you send a message in email. If the sender email haven’t recognized in cPanel then you will be getting this message. There is another situation where few users are not getting the email from certain accounts.
How to resolve this 550 verification failed in EXIM?
It’s all because of only three words ‘Sender verification callouts’. To spamming as inbound mechanism, the mail server creates a term called sender verification callouts. Spammers are the one who sends you spam messages often. When you get a spam message the emails are verified by the section MAIL FROM.
Email verification:
Each email is verified by sending a command along with the sender email address + ‘RCPT TO’. Once if the mail server accepts the command then the sender email address is confirmed.
EXIM will be adjoining with send email address mail exchanger. While this process occurs then sender email address will be verified. If it doesn’t get verified then certain emails from that account will be ignored. This can be solved by just following the below steps one by one:
Step 1: Use your username and password to login in WHM. Choose Exim configuration manager by selecting service configuration option.
Step 2: In exim configuration manger, you can see four tabs such as basic editor, advanced editor, backup, restore and reset.
Step 3: Select the tab basic editor, and again you will get 9 tabs such as all, ACL options, Access lists, domains & IPs, filters, mail, RBLs, security and Apache SpamAssassainTMoption.
Step 4: Select the mail tab, check the first option Sender verification callouts is on or off. Set it as off and then finally click on save button.
It’s not a vague task to verify sender of emails. Follow the steps and make it easy to access.