Introduction
Hello folks! In this article we are going to see the step-by-step guide to be followed for controlling a particular interface or IP address that can be used for outbound mail. Before moving to the step by step guide let me give you an introduction to this topic on controlling a particular interface or IP address that can be used for outbound mail. This occurs when more than two interfaces were being configured to the same kind of subnet here most of the interfaces will tend to face or encounter traffic.
What about outbound traffic?
The main fact to be noted here is that only one of those certain interfaces will be available for using the purpose of outbound traffic. The important rule here is that these interface or adapter gets added to the computer in the first place is used for the purpose of outbounding the traffic faced by the certain interface or adapter. This can be checked or monitored by using and entering the command called “ipconfig” from the windows of Command Prompt. The correct process of routing and the preferences for adapter is basically decided and controlled by the Windows. But be alert and remember that changing the settings or behaviour slightly will lead to serious consequences and complications here. In order to avoid the circumstances that compels you to make changes in the configuration of the network that underlies in the settings of the network, MailEnable allows and provides the function to decide which IP address can or should be used for the purpose of sending outbound mail.
A step-by-step guide
Let’s see a step-by-step guide to be followed for controlling a particular interface or IP address that can be used for outbound mail.
Step 1: The first step is to open the MailEnable Administration program.
Step 2: After opening the MailEnable Administration program, you should go to the MailEnable Managements --> Servers --> Localhost --> Connectors --> then, right click on SMTP --> Properties.
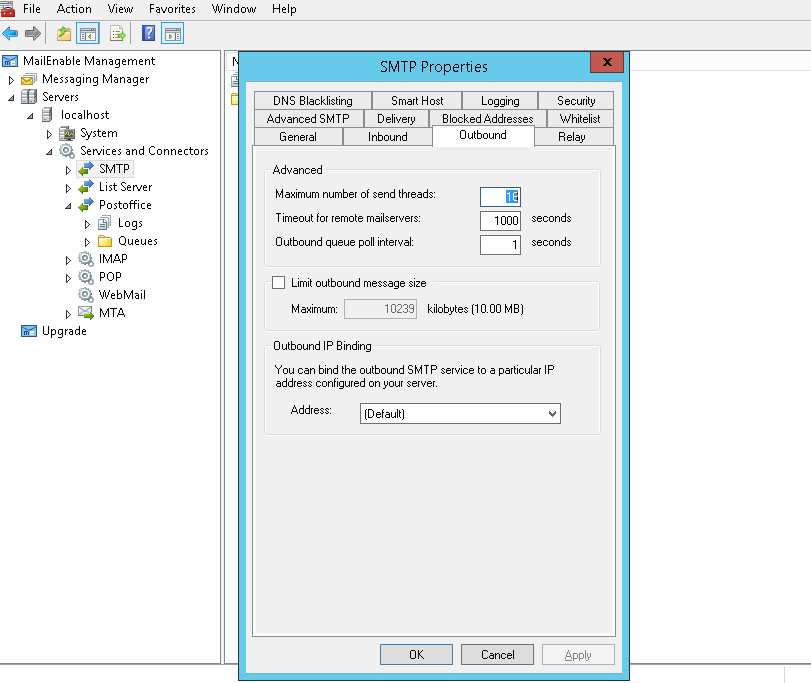
Step 3: Now the third step is to click on the Outbound tab.
Step 4: Here it is important to know that by going in the path of Outbound IP Binding section, you will be capable of setting the outbound binding to a certain or particular IP address of the server.
Here are some of the other additional possibilities or outcomes that can be used for the purpose of changing the underlying networking environment for similar results.
Hello folks! In this article we are going to see the step-by-step guide to be followed for controlling a particular interface or IP address that can be used for outbound mail. Before moving to the step by step guide let me give you an introduction to this topic on controlling a particular interface or IP address that can be used for outbound mail. This occurs when more than two interfaces were being configured to the same kind of subnet here most of the interfaces will tend to face or encounter traffic.
What about outbound traffic?
The main fact to be noted here is that only one of those certain interfaces will be available for using the purpose of outbound traffic. The important rule here is that these interface or adapter gets added to the computer in the first place is used for the purpose of outbounding the traffic faced by the certain interface or adapter. This can be checked or monitored by using and entering the command called “ipconfig” from the windows of Command Prompt. The correct process of routing and the preferences for adapter is basically decided and controlled by the Windows. But be alert and remember that changing the settings or behaviour slightly will lead to serious consequences and complications here. In order to avoid the circumstances that compels you to make changes in the configuration of the network that underlies in the settings of the network, MailEnable allows and provides the function to decide which IP address can or should be used for the purpose of sending outbound mail.
A step-by-step guide
Let’s see a step-by-step guide to be followed for controlling a particular interface or IP address that can be used for outbound mail.
Step 1: The first step is to open the MailEnable Administration program.
Step 2: After opening the MailEnable Administration program, you should go to the MailEnable Managements --> Servers --> Localhost --> Connectors --> then, right click on SMTP --> Properties.
Step 3: Now the third step is to click on the Outbound tab.
Step 4: Here it is important to know that by going in the path of Outbound IP Binding section, you will be capable of setting the outbound binding to a certain or particular IP address of the server.
Here are some of the other additional possibilities or outcomes that can be used for the purpose of changing the underlying networking environment for similar results.
- By changing the interface’s order in the computer and making sure of certain interface for using in outbound, this should be added first.
- By configuring NAT. This forces all outbound traffic to look like occurred from same IP address.
- By configuring static routes that points at a certain interface locally for giving specific outbound route. This can be achieved by using the route command in the command prompt. Here you will have to specify the typology of the IP networking.