Blacklist/Whitelist a Country in WHM
WHM is a Web Host Manager that allows you to access the administration of VPS or dedicated sever of cPanel. It also allows you to access the custom support of the hosting provider. WHM helps you to run your old server or resell the services for web hosting. CPanel is used to manage hosting accounts in the server separately. The user can set the features through WHM by Reseller or System Administrator. Many businesses get benefit from WHM and it has many procedures and operations. With this you can create, suspend or delete accounts in cPanel. Flexibility in WHM allows you to manage accounts in your domain or hosting and also accounts of a reseller. In spite of installing the system and server, it also allows you to configure the backups of automatic or manual systems and perform transfer of accounts among the servers. If you combine WHM with cPanel it will be a fully featured control panel system for web hosting. Though WHM you can also get permission to check the information and status of the server.
3rd party Plugins are attached with the cPanel core to enable the blacklist or whitelist a country. CPHulk Plugin has the advanced protection for accessing a country in WHM. Many changes have been made in the Web CPanel Control Panel and the new version of the cPanel has been come up with the feature of blocking the entire country’s server access. Protection System of CPHulk in cPanel has the new feature of Blacklisting or Whitelisting of the Country. This feature is useful for the owners who have many logins which is failed and get brute force attack from particular country. With this option they need not sell the products to the specific countries if they blacklist them.
Through WHM one can manage brute force attack of cPHulk.
Step 1 – As a root user login to WHM.
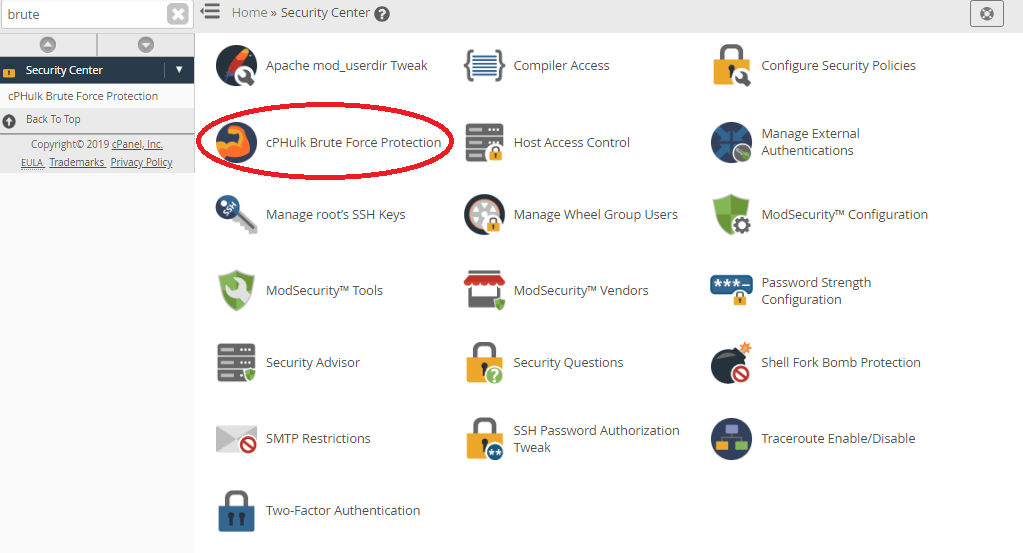
Step 2 – In the Security Centre section, select cPHulk Brute Force Protection.
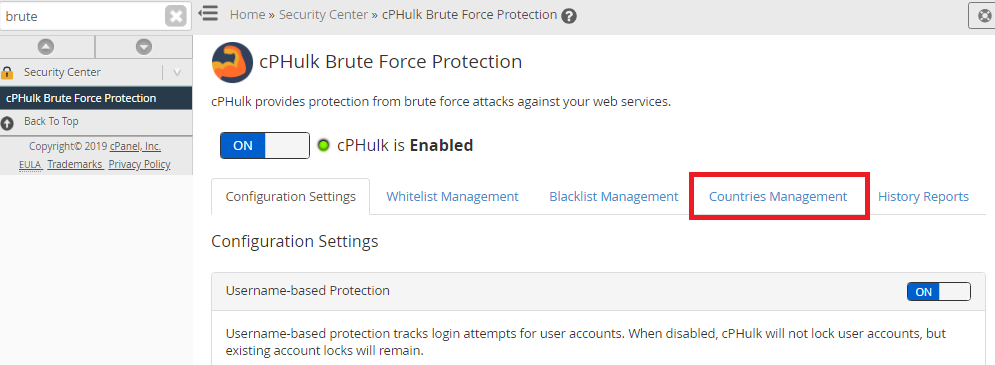
Step 3 – In the cPHulk Brute Force Protection, select Countries Management.
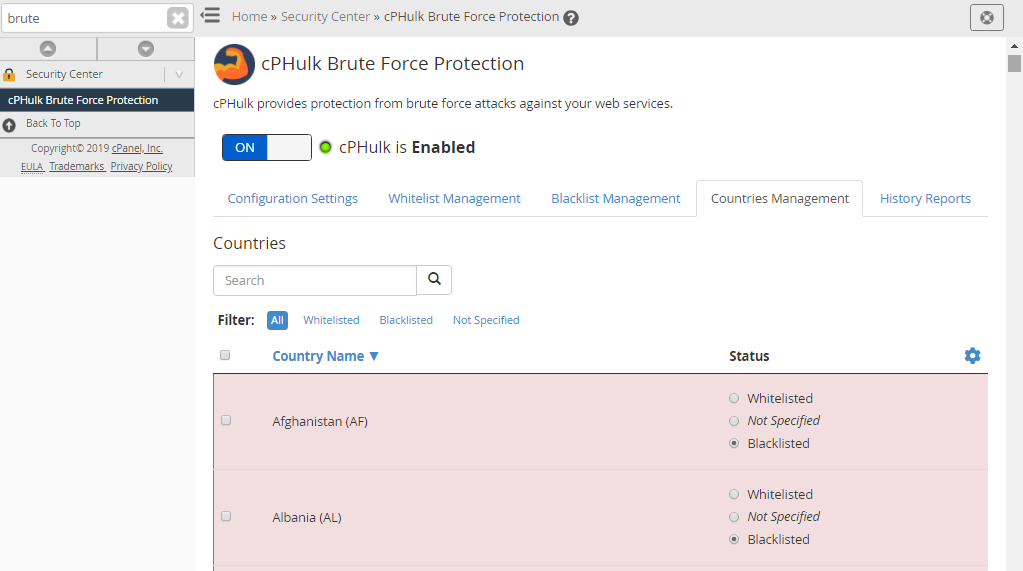
Step 4 – Countries list will be displayed. From the search field, you can select the country you need to whitelist or blocklist.
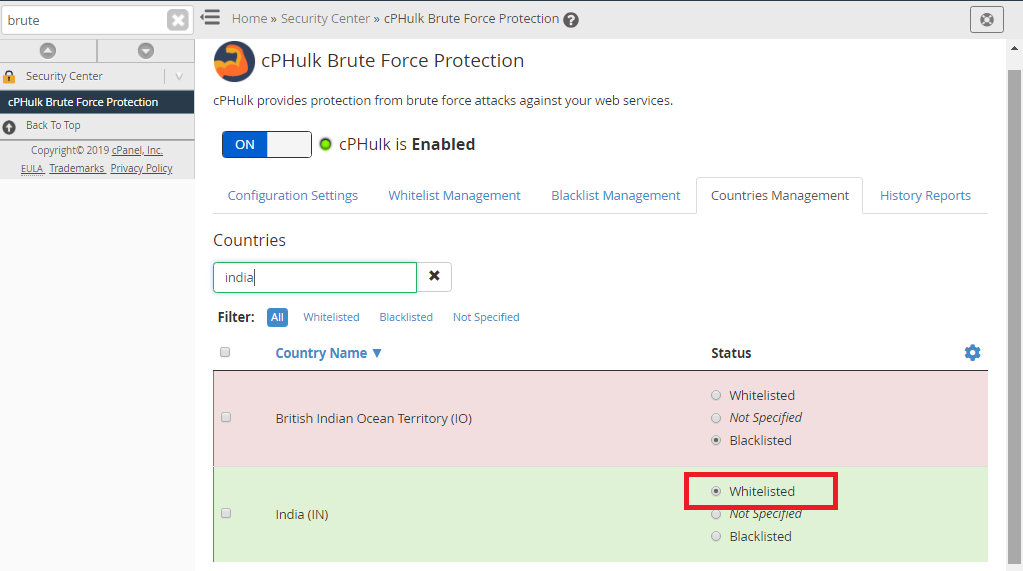
Step 5 – Select the Whitelist/Blacklist option.
Step 6 – After finishing, Country whitelist and blacklist update message will be displayed.
New tab is added CPHulk to manage the blocking of countries for adding for both blacklist and whitelist. In Blacklisting, server management officials block the access of the countries and in Whitelisting allows the accessing of particular country and blocks some countries who have failed logins or brute force attack. This is useful when you have many users from particular country and you don’t want to block them for some reason.
Whitelisting will not be effective as it bypasses any logs by allowing the attackers using VPN connection. Both are used by content providers who allow one or two countries to access their content and don’t allow other countries accessing their content. Now website owners have better control to access the countries either by allowing or denying them.
WHM is a Web Host Manager that allows you to access the administration of VPS or dedicated sever of cPanel. It also allows you to access the custom support of the hosting provider. WHM helps you to run your old server or resell the services for web hosting. CPanel is used to manage hosting accounts in the server separately. The user can set the features through WHM by Reseller or System Administrator. Many businesses get benefit from WHM and it has many procedures and operations. With this you can create, suspend or delete accounts in cPanel. Flexibility in WHM allows you to manage accounts in your domain or hosting and also accounts of a reseller. In spite of installing the system and server, it also allows you to configure the backups of automatic or manual systems and perform transfer of accounts among the servers. If you combine WHM with cPanel it will be a fully featured control panel system for web hosting. Though WHM you can also get permission to check the information and status of the server.
3rd party Plugins are attached with the cPanel core to enable the blacklist or whitelist a country. CPHulk Plugin has the advanced protection for accessing a country in WHM. Many changes have been made in the Web CPanel Control Panel and the new version of the cPanel has been come up with the feature of blocking the entire country’s server access. Protection System of CPHulk in cPanel has the new feature of Blacklisting or Whitelisting of the Country. This feature is useful for the owners who have many logins which is failed and get brute force attack from particular country. With this option they need not sell the products to the specific countries if they blacklist them.
Through WHM one can manage brute force attack of cPHulk.
Step 1 – As a root user login to WHM.
Step 2 – In the Security Centre section, select cPHulk Brute Force Protection.
Step 3 – In the cPHulk Brute Force Protection, select Countries Management.
Step 4 – Countries list will be displayed. From the search field, you can select the country you need to whitelist or blocklist.
Step 5 – Select the Whitelist/Blacklist option.
Step 6 – After finishing, Country whitelist and blacklist update message will be displayed.
New tab is added CPHulk to manage the blocking of countries for adding for both blacklist and whitelist. In Blacklisting, server management officials block the access of the countries and in Whitelisting allows the accessing of particular country and blocks some countries who have failed logins or brute force attack. This is useful when you have many users from particular country and you don’t want to block them for some reason.
Whitelisting will not be effective as it bypasses any logs by allowing the attackers using VPN connection. Both are used by content providers who allow one or two countries to access their content and don’t allow other countries accessing their content. Now website owners have better control to access the countries either by allowing or denying them.