Reasons for Email Going To Spam Box and it’s Solution:
Actually 79% of commercial emails sent to Inbox. This means that few emails are sent to spam box or blocked. The emails going to spam box can be avoided using spam filter. There many reasons why the mail is not delivered to Inbox. The reasons are given below,
Step 1: The subscribers are instructed to Whitelist the Email
New Subscribers has to be informed to whitelist the person’s email. The subscriber should receive all the important emails. Reputation of the sender is increased by having many email whitelist and the delivery rate of the inbox will be increased.
Steps to whitelist Email address with Gmail:
Gmail users have problem of finding the emails as they have filtered the email to the Promotions Tab even though the email didn’t go to the spam.
Step 3: Method of organizing email in special folders should be learnt
One can get email from many subscribers and all of them are instructed about organizing the emails into the special folders.
Steps 4: Enable DKIM and SPF record for domain:
DKIM (Domain Key Identified Mail) and SPF (Sender Policy Frame) are the records in the DNS (Domain Name System) that are used to reduce the spam. DKIM is a method for email authentication and it uses the domain information given by the owner of the domain. SPF records says about the mail server authorization for sending mails.
For enabling the DKIM and SPF records in WHM:

Actually 79% of commercial emails sent to Inbox. This means that few emails are sent to spam box or blocked. The emails going to spam box can be avoided using spam filter. There many reasons why the mail is not delivered to Inbox. The reasons are given below,
- IP Address used by someone for spamming- If somebody uses a person’s IP address for spamming, then the Person’s emails are sent to spam box. Like if on shared server spamming occurs it affects all other clients because the server’s IP address is used for spamming.
- If the Subscribers forgets the person- Each the subscriber report the mail as spam even if it is not a spam. This complaint is noted by the mailbox provider. If the complaint reaches some point, all the mail sent will go to the spam box instead of inbox. To prevent the subscriber report the person should not forget their branding and the branding should match the given website. Images, typography, colours and voice are included in that. From line should be the recognizing name.
- Misleading Subject Line- The law states that one should not intentionally mislead the other with the incorrect subject line. Some people cheat by sending promotional emails. If your subject contains any spam keyword or misleading line then your email considered as spam mail.
- Inaccurate “From” Information- The law says that one should not mislead the other with “from”, “reply-to”, “to” and routing information. Always remember to include a name in “from” field so that your clients or subscriber remember it. The name could be your company name, individual name, or a combination.
- Physical address should not be included- The address must be present street address or post office address that may be registered with U.S postal service or commercial mail receiving agency. If you neglect the physical address
- Using Spam Trigger words- The body or subject line of the email should be triggered by some words like amazing, click here, check money, congratulations, great offer, etc. A built-in tool is used by the email provider for checking the emails before sending it to another person.
Step 1: The subscribers are instructed to Whitelist the Email
New Subscribers has to be informed to whitelist the person’s email. The subscriber should receive all the important emails. Reputation of the sender is increased by having many email whitelist and the delivery rate of the inbox will be increased.
Steps to whitelist Email address with Gmail:
- Open Gmail.
- You can see the dropdown arrow near "Reply" button, click on it.
- Choose "Add to Contacts List".
- Now click on the "More" button.
- Choose "Filter messages like these".
- Click on the “Create filter with this search” at bottom.
- At last check the box "Never send it to Spam".
- Open your email account.
- Now right click on sender’s name and choose "Add to Outlook Contacts".
- Click on Save.
- Click on "Options" on Tools menu.
- Now under Email on Preferences tab, click on "Junk E-mail".
- Click on Safe Senders tab.
- Tick on “Also trust e-mail from my Contacts” checkbox.
Gmail users have problem of finding the emails as they have filtered the email to the Promotions Tab even though the email didn’t go to the spam.
Step 3: Method of organizing email in special folders should be learnt
One can get email from many subscribers and all of them are instructed about organizing the emails into the special folders.
Steps 4: Enable DKIM and SPF record for domain:
DKIM (Domain Key Identified Mail) and SPF (Sender Policy Frame) are the records in the DNS (Domain Name System) that are used to reduce the spam. DKIM is a method for email authentication and it uses the domain information given by the owner of the domain. SPF records says about the mail server authorization for sending mails.
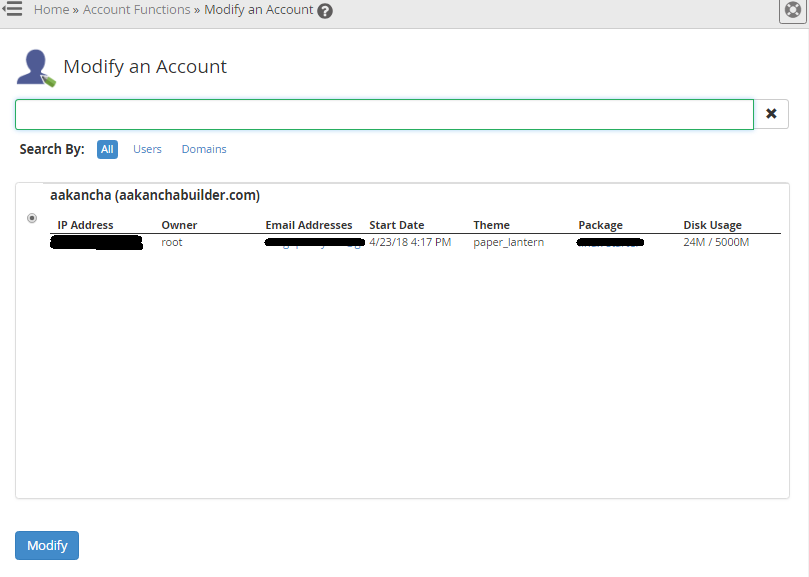
For enabling the DKIM and SPF records in WHM:
- Login to WHM.
- Click on "Modify an account"
- Here choose particular email account.
- In the "DNS Settings" section, tick the checkboxes "Enable DKIM on this account" and "Enable SPF on this account"
- Click on "Save"
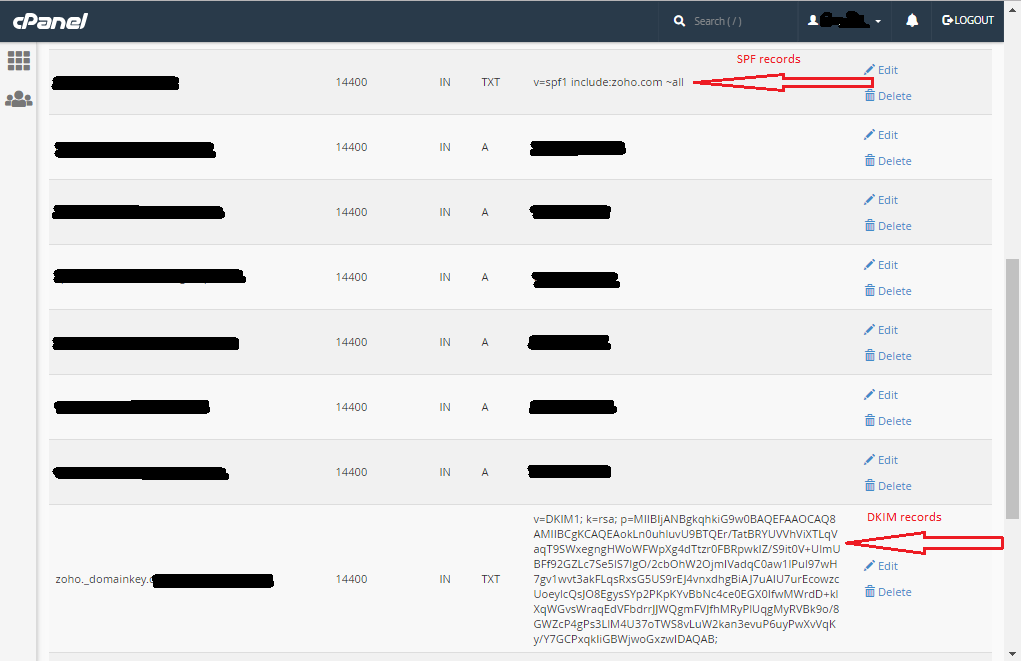
- Login into cpanel.
- Click on “Zone Editor” and click on “Manage” option for particular domain.
- Here you can create TXT records for creating DKIM and SPF record.