How to create a Node.js application with cPanel using the Node.js selector?
How to set up a graphical interface of cPanel along with Node.js application? Yes! You can easily set up this process by using the Node.js selector.
Most probably, we are using variables like below-mentioned:
To set up the Node.js application along with the interface of cPanel, you can follow the below-mentioned method on your choice.
Method 1:
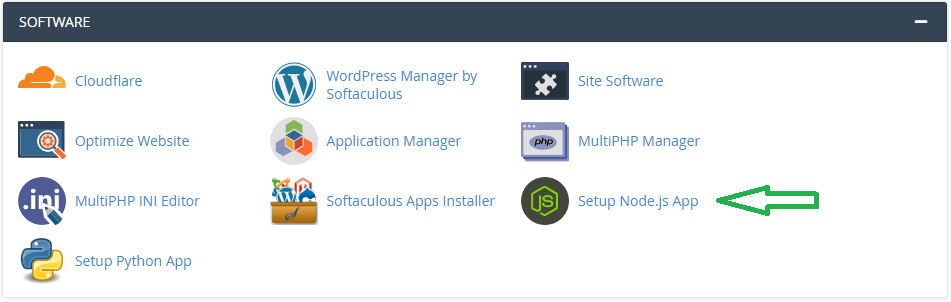
Step 1: Go to cPanel and then log in using the username and password. After login, check for the section “Software”.
Step 2: Tap on the option “setup node.js app” and so, it opens up the Node.js selector. Here, you need to set up the Node.js application by tapping on the option “CREATE APPLICATION”.

Step 3: It’s time to fill up the forms which display some details like mentioned below:
Node.js version: You can see the list of drop-down so, select the version based on the requirement.
Application mode: Either you can choose production or development from the shown list. We are in development mode right so tap on development first. Later, we can change the requirement for production.
Application root: The application file location is fixed here. You can check the application file added to the path /home/username.
Note: You should not use domain document root for saving application root.
Application URL: The application address is added here.
Application startup file: Whenever you launch the application along with that startup file will be processed.

Step 4: After completion, tap on the button “create”.
Step 5: Choose the option “open” for checking the test page of the application that would start automatically.
Confirm the process after getting the message “It works!”
Step 6: Start creating the package.json file. In the cPanel dashboard, go to section “file” and tap on the icon “file manager”.
Step 7: Click on the application root folder present on the left side of the file manager. To create a new file, tap on the button +file and then enter the name as package.json
Step 8: Don’t forget to click on the button “create a new file”. By now, the file will be created and make changes on the file by right-clicking the package.json file.
Step 9: You can see the option “edit” for editing the new file. Add the below-mentioned text in the editor:
Step 11: The creation of the file is over! Next, start installing npm. Go to cPanel dashboard, choose the section “software” and then tap on the icon “setup Node.js App” to open the Node.js selector.
Step 12: Edit the application by tapping on the icon present in the column of action.
Step 13: It will start the process of running NPM installation. You will get the message as “NPM install completed successfully!”
After the installation of NPM starts installing packages too! You can perform the command line by login into SSH and then enter the virtual environment on-page of the application setup.

Method 2:
How to use the command line for setting Node.js application?
Some would prefer to use bash shell and SSH in that case they will also prefer command-line execution because it will be fast and easy to navigate. Follow the below steps to use the command line for creating a Node.js application
Step 1: Use SSH to login into the account. Start creating the application with the command as
Step 6: Again, start installing the npm by executing the below command:
Use below command to stop the application:
How to set up a graphical interface of cPanel along with Node.js application? Yes! You can easily set up this process by using the Node.js selector.
Most probably, we are using variables like below-mentioned:
| S.No | Variable Name | Description |
|---|---|---|
1. | app | It is used in the application URL and root directory of the application. |
2. | example | It is used as a username |
3. | Example.com | For domain purpose, you can use this. |
4. | App.js | It is used for the file application startup. |
5. | My app | You can use it for description |
6. | 10 or 11 | This variable is recommended for version number used majorly in node.js |
To set up the Node.js application along with the interface of cPanel, you can follow the below-mentioned method on your choice.
Method 1:
Step 1: Go to cPanel and then log in using the username and password. After login, check for the section “Software”.
Step 2: Tap on the option “setup node.js app” and so, it opens up the Node.js selector. Here, you need to set up the Node.js application by tapping on the option “CREATE APPLICATION”.
Step 3: It’s time to fill up the forms which display some details like mentioned below:
Node.js version: You can see the list of drop-down so, select the version based on the requirement.
Application mode: Either you can choose production or development from the shown list. We are in development mode right so tap on development first. Later, we can change the requirement for production.
Application root: The application file location is fixed here. You can check the application file added to the path /home/username.
Note: You should not use domain document root for saving application root.
Application URL: The application address is added here.
Application startup file: Whenever you launch the application along with that startup file will be processed.
Step 4: After completion, tap on the button “create”.
Step 5: Choose the option “open” for checking the test page of the application that would start automatically.
Confirm the process after getting the message “It works!”
Step 6: Start creating the package.json file. In the cPanel dashboard, go to section “file” and tap on the icon “file manager”.
Step 7: Click on the application root folder present on the left side of the file manager. To create a new file, tap on the button +file and then enter the name as package.json
Step 8: Don’t forget to click on the button “create a new file”. By now, the file will be created and make changes on the file by right-clicking the package.json file.
Step 9: You can see the option “edit” for editing the new file. Add the below-mentioned text in the editor:
Step 10: Save the file by clicking the button “save file” and then tap on the close button.
Step 11: The creation of the file is over! Next, start installing npm. Go to cPanel dashboard, choose the section “software” and then tap on the icon “setup Node.js App” to open the Node.js selector.
Step 12: Edit the application by tapping on the icon present in the column of action.
Step 13: It will start the process of running NPM installation. You will get the message as “NPM install completed successfully!”
After the installation of NPM starts installing packages too! You can perform the command line by login into SSH and then enter the virtual environment on-page of the application setup.
Method 2:
How to use the command line for setting Node.js application?
Some would prefer to use bash shell and SSH in that case they will also prefer command-line execution because it will be fast and easy to navigate. Follow the below steps to use the command line for creating a Node.js application
Step 1: Use SSH to login into the account. Start creating the application with the command as
Step 2: Here, you need to change directly to application directory:
Step 3: Now, open the editor “vi” to create a file called “package.json”.
Step 4: Change the mode as insert by pressing the key “i” to paste the below-mentioned text:
Step 5: Now to change from insert mode into command mode press the button “enter”. Also, press the button “x” for file save and editor exist.
Step 6: Again, start installing the npm by executing the below command:
Step 7: You can control the application in running state by restarting the application, starting the application and stopping the application.
Use below command to stop the application:
Use the below command to start the application:
Use the below command to restart the application:
We have explained the process of setup the Node.js application in the interface of cPanel using Node.js selector. The process may be a little complicated but easy to understand and implement.