Adding The Posts Via Email In Wordpress
Do you have a WordPress website? Have you been facing challenges trying to upload your content? This article will solve your problems. WordPress is the most comfortable and most efficient and powerful blogging and website context created as a blog publishing system.
At times, the use of a website becomes so hard to access in case of banning from some government policies put in place in different countries. In times like this, many people get confused about what to do next since, due to the ban of their Website, this is where the posting by email in WordPress comes in to guard you against all the challenges and provides a chance to post by an email.
Places with low network coverage can also use the method that is more efficient and accurate instead of enduring these challenges. Most journalists and website owners use this method to post if they are in low network coverage areas. You can see how posting by using email in WordPress in posting your blogs is beneficial and accurate, and it is reliable in different fields.
How to add the feature of email in WordPress
The first step is using POP3 access to create a private email address account. You can use either a Gmail or email of your domain to create the email address. The email account created should not be easy to guess; therefore, it is advisable to create a potent combination of alphabets and numeric to make it hard to guess. For examplne 3ac23a5g67a@gmail.com
It is essential to avoid anyone from accessing your email or posting into your account without your knowledge.
You can add posts in your WordPress website upon creating the email address account. It helps in the notification of any emails received to appear as new posts.
WordPress contains an inbuilt post by email by default found by clicking on the settings then writing page. At this point, one will have to provide a mail server address, login name and password.
How can you post by email in WordPress?
If you would like to add a post in your WordPress website by email, follow the steps below;
Use the following steps to verify if your post is successful;
Add your post as new WordPress post and automatically be publish it in your website.
In conclusion, posting all types of content in your WordPress website is so simple and effective, provided you follow the necessary steps. If you use the above steps, you will work most efficiently and effectively on your Website. It is up to you to start using the simple steps while posting on your Website. In case you have, any question or you need some clarification you can ask in the comments session.
Do you have a WordPress website? Have you been facing challenges trying to upload your content? This article will solve your problems. WordPress is the most comfortable and most efficient and powerful blogging and website context created as a blog publishing system.
At times, the use of a website becomes so hard to access in case of banning from some government policies put in place in different countries. In times like this, many people get confused about what to do next since, due to the ban of their Website, this is where the posting by email in WordPress comes in to guard you against all the challenges and provides a chance to post by an email.
Places with low network coverage can also use the method that is more efficient and accurate instead of enduring these challenges. Most journalists and website owners use this method to post if they are in low network coverage areas. You can see how posting by using email in WordPress in posting your blogs is beneficial and accurate, and it is reliable in different fields.
How to add the feature of email in WordPress
The first step is using POP3 access to create a private email address account. You can use either a Gmail or email of your domain to create the email address. The email account created should not be easy to guess; therefore, it is advisable to create a potent combination of alphabets and numeric to make it hard to guess. For examplne 3ac23a5g67a@gmail.com
It is essential to avoid anyone from accessing your email or posting into your account without your knowledge.
You can add posts in your WordPress website upon creating the email address account. It helps in the notification of any emails received to appear as new posts.
WordPress contains an inbuilt post by email by default found by clicking on the settings then writing page. At this point, one will have to provide a mail server address, login name and password.
How can you post by email in WordPress?
If you would like to add a post in your WordPress website by email, follow the steps below;
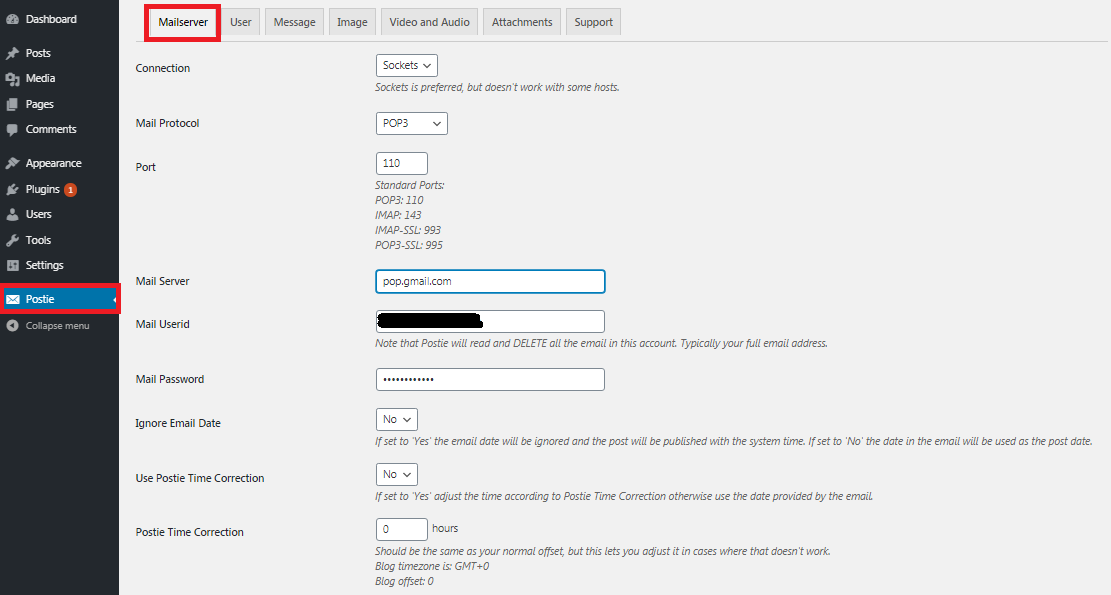
- The first step is installation and activation of a Postie plugin (On activating addition of a new item will occur on the WordPress bar)
- Click on the new item and fill in the login password of the private account initially created.
- Gmail users should ensure that POP3 is active.
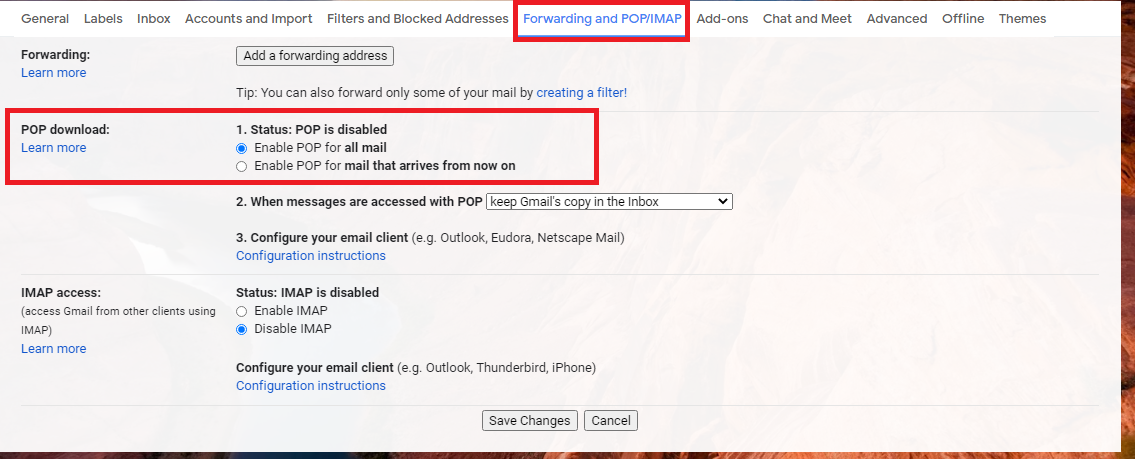
- Click Gmail gear icon and then settings.
- Move to ‘’forwarding & POP/IMAP’’.
- Select POP for the mail.
- Click save to save the settings.
- Choose POP3 as mail protocol and No for ‘transport layer security (TLS)’ in the Postie settings.
- Use 995 and pop.gmail.com for port and the mail server.
- Type your account login details, that is, the mail address and password.
Use the following steps to verify if your post is successful;
- Send a message by email to the private address account.
- Go to your ‘Postie settings page’ and click on the Run Postie button.
Add your post as new WordPress post and automatically be publish it in your website.
In conclusion, posting all types of content in your WordPress website is so simple and effective, provided you follow the necessary steps. If you use the above steps, you will work most efficiently and effectively on your Website. It is up to you to start using the simple steps while posting on your Website. In case you have, any question or you need some clarification you can ask in the comments session.