Have you ever noticed your website displaying strange error pages or eating up disc space? If you did, you may put it on maintenance mode. So, if your website is causing issues with the server, you should disable it. Let's assume your users are seeing a lot of error pages, but you keep the site up and running. In this situation, your server may be used more than normal.
As a result, it's important to go one step further and provide a maintenance page. There are numerous plugins available nowadays, but you need also be familiar with the cPanel manual way. In this article, you'll learn how to quickly disable a problematic WordPress site using cPanel.
Display 503 Temporary Offline Page by editing the .htaccess file
As you may be aware, WordPress contains two important files, one of which is .htaccess. All redirects and numerous rewrite rules are controlled by this file.
In this article, you'll learn how to change the file to make your site show a 503 temporarily unavailable/offline status. You may use anything imaginative to inform your readers of the exact time restriction in which they can access your website.
Let's get this party started!
Step 1: Log in to your cPanel account as normal and look for the File manager icon under the files area.
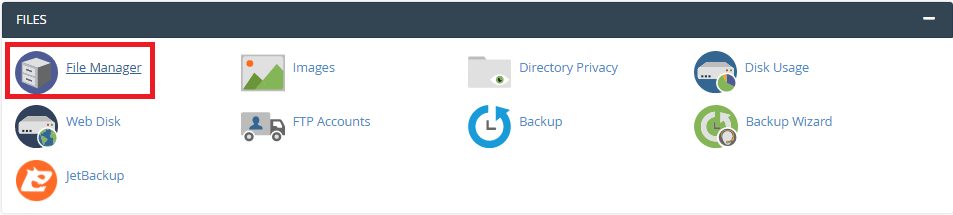
Note: Because your web hosting provider may utilize its design template, you may see a distinct cPanel layout. The file manager icon may be seen on every control panel.
Step 2: To open, simply click the button.
Step 3: It's conceivable that the home directory will be shown by default. Make sure the public_html directory is visible by selecting it from the left-hand sidebar.
Step 4: Locate the .htaccess file by scrolling down. If you don't, it's because you haven't turned on the option to see hidden files.
Check the option to reveal hidden files in the top-right corner of the screen.

Step 5: Right-click on the .htaccess file to modify it.
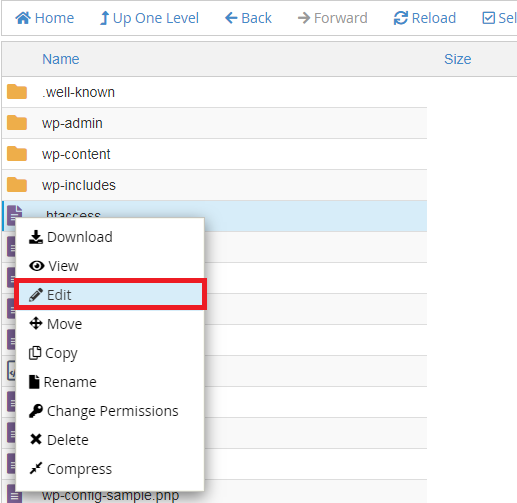
Step 6: A window displays with the option to turn off encoding. Nothing to be concerned about; simply click the Edit button, and a new tab will emerge in your browser.
Step 7: The file's code is visible. The code has to be copied and pasted.
Step 8: In the top-right corner, click the Save Changes button. Check your site after clearing your browser cache; it should show a default error page with an error message you added to the code.
Note: You may change the error message to alert your readers and encourage them to return to your site later.
Some individuals utilize simple HTML to make a page appear more appealing. Are you up to the challenge? It's OK if you don't. The main goal is to inform both the search engine and the users that you are working on the site.
You should not leave your site unattended for more than a few days. Make every effort to resolve the issue as quickly as feasible. Search engine bots may sometimes perceive such a site to be permanently down, affecting the site's search indexing.
Disabling a website isn't too difficult! You might be asking why you shouldn't use a plugin to do this. Well, the first step in troubleshooting is to disable all WordPress plugins.
So, we are sure you've received your response. Using the manual technique instead of a plugin is much better. The. htaccess file may be used for a variety of purposes.
Conclusion:
It's a good idea to include the code to display a 503 error message. As I previously stated, you may demonstrate your originality via the use of words. By now editing .htaccess isn't too difficult!
As a result, it's important to go one step further and provide a maintenance page. There are numerous plugins available nowadays, but you need also be familiar with the cPanel manual way. In this article, you'll learn how to quickly disable a problematic WordPress site using cPanel.
Display 503 Temporary Offline Page by editing the .htaccess file
As you may be aware, WordPress contains two important files, one of which is .htaccess. All redirects and numerous rewrite rules are controlled by this file.
In this article, you'll learn how to change the file to make your site show a 503 temporarily unavailable/offline status. You may use anything imaginative to inform your readers of the exact time restriction in which they can access your website.
Let's get this party started!
Step 1: Log in to your cPanel account as normal and look for the File manager icon under the files area.
Note: Because your web hosting provider may utilize its design template, you may see a distinct cPanel layout. The file manager icon may be seen on every control panel.
Step 2: To open, simply click the button.
Step 3: It's conceivable that the home directory will be shown by default. Make sure the public_html directory is visible by selecting it from the left-hand sidebar.
Step 4: Locate the .htaccess file by scrolling down. If you don't, it's because you haven't turned on the option to see hidden files.
Check the option to reveal hidden files in the top-right corner of the screen.
Step 5: Right-click on the .htaccess file to modify it.
Step 6: A window displays with the option to turn off encoding. Nothing to be concerned about; simply click the Edit button, and a new tab will emerge in your browser.
Step 7: The file's code is visible. The code has to be copied and pasted.
Code:
ErrorDocument 503 "<h1>Site is Temporarily down for Troubleshooting</h1>"
RewriteEngineOn
RewriteRule .* - [R=503,L]Note: You may change the error message to alert your readers and encourage them to return to your site later.
Some individuals utilize simple HTML to make a page appear more appealing. Are you up to the challenge? It's OK if you don't. The main goal is to inform both the search engine and the users that you are working on the site.
You should not leave your site unattended for more than a few days. Make every effort to resolve the issue as quickly as feasible. Search engine bots may sometimes perceive such a site to be permanently down, affecting the site's search indexing.
Disabling a website isn't too difficult! You might be asking why you shouldn't use a plugin to do this. Well, the first step in troubleshooting is to disable all WordPress plugins.
So, we are sure you've received your response. Using the manual technique instead of a plugin is much better. The. htaccess file may be used for a variety of purposes.
Conclusion:
It's a good idea to include the code to display a 503 error message. As I previously stated, you may demonstrate your originality via the use of words. By now editing .htaccess isn't too difficult!