Besides hosting the WordPress and database on the same server, you have the option of hosting each of these entities separately on a different server. Now to have them working together to display content, you have to configure them. In this guide-cum-article, we’ll explain to you the concept of configuring WordPress with an external database hosted on a different server.
When you use an external database, you store your database on a different server and it is known as database-server. The server where your WP files are hosted is known as application-server. You need to make these two talk with each other. Technically speaking, you’ll execute MySQL queries on the database server and return the response to the application server.
This isolated hosting architecture has several benefits, some of which are:
You get more computing power than what your current database server can offer.
When there’s a downtime, it’ll be easier for you to verify if the problem is with database or the WP files and rectify accordingly.
You can easily monitor the load and memory allocation on the application server.
Now let’s get to configuration. To make the data exchange possible, you’d need to configure both the servers.
Configuring the Application Server
First let’s configure the app server. We need to install two things here.
The file line will update the repositories, second will upgrade the required packages, and the third will install the Apache. Fourth line of code will install PHP and other libraries required to run WordPress on the application server. The last line of code will install a MySQL client which we will use for testing purposes..
To ensure if both PHP and Apache got installed and configured properly, use these commands:
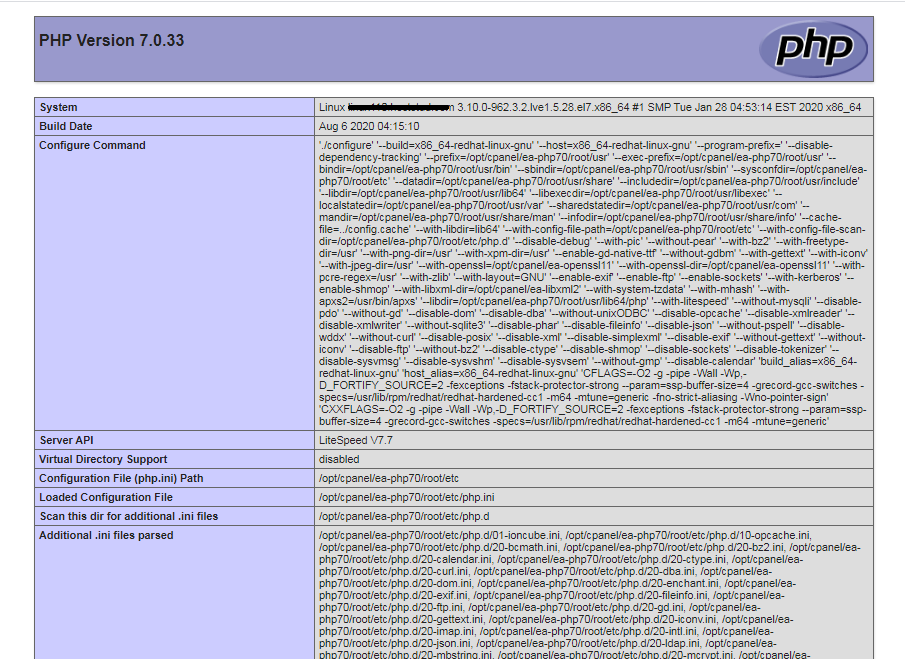
Now go to your browser where you’ll see the PHP information. This will confirm that the installation process went right.
Configuring the Database Server
The second configuration you need to do is of the Application server. You need to install MySQL (which is the database language for WordPress) and update the config file. This is going to be easier than the configuration needed for Application server and will take few lines of code.
Use the below commands which will install MySQL on your db server:
You’d need the MySQL root password when executing the third command. The fourth command will ask you a set of questions that are needed for configuration. You need to type “No” for first two. The questions will be:
To confirm that you have installed the MySQL package successfully, try logging in to the server using the below command:
If successful, then you need to update the configuration file so that you can have remote access. For this, open the MySQL config file by using this command:
Look for the line that specify the “bind-address” property. Uncomment this particular line and replace the default value with your database server’s IP address. It should look like this:
Save the file with the CTRL+X then Y.
Now you’ve prepared the server environment where the WordPress application and MySQL application can run properly.
Create the Database
Next thing you need to do is create databases on MySQL server where WordPress-related data will be stored.
Log in to MySQL server with this command:
This will ask you for the password, for which you need to provide the one you used when installing the MySQL server. If you pass through this process, execute these commands one by one:
To check if the database creation process was successful, log in to your application server and execute this command:
Put in the security password you had set previously to access the DB server. If you’re able to get in, then you’ve installed the MySQL server correctly.
Install WordPress on the App Server
With database out of the way, it’s time to focus on the Application server which is what you and your users will be interacting with.
First thing you have to download the WordPress software which is free of cost. Then you have to establish the connection to the database server and have them communicate back and forth.
On the application server, you need to execute these commands:
Explaining the commands, in the first line, you changed the directory to a desired URL. Next line removed everything in that folder, third line installed the WordPress files while the fourth extracted it. The fifth line shifted the WP files from from wordpress to current directory. The sixth line deleted any excess of directories present. Finally, the last line sets proper permission for access.
Now you’ve downloaded WordPress successfully and now you have to install. You can do it from the browser. Visit the public IP address of your app server from your browser. If you’ve already pointed the domain name to the IP address, you should use the domain name instead.
From here on, everything will be self-explanatory till you reach the “Run The Installation” step. You should be able to everything on your own. If you get an error, you should verify database connectivity and try again.
Now you’ve successfully configured WordPress which uses an external database.
When you use an external database, you store your database on a different server and it is known as database-server. The server where your WP files are hosted is known as application-server. You need to make these two talk with each other. Technically speaking, you’ll execute MySQL queries on the database server and return the response to the application server.
This isolated hosting architecture has several benefits, some of which are:
You get more computing power than what your current database server can offer.
When there’s a downtime, it’ll be easier for you to verify if the problem is with database or the WP files and rectify accordingly.
You can easily monitor the load and memory allocation on the application server.
Now let’s get to configuration. To make the data exchange possible, you’d need to configure both the servers.
Configuring the Application Server
First let’s configure the app server. We need to install two things here.
- Apache which will serve HTTPs
- PHP
Code:
root@application-server:~# apt-get update
root@application-server:~# apt-get upgrade -y
root@application-server:~# apt-get install apache2 -y
root@application-server:~# apt-get install php7.0 php7.0-curl php7.0-mysql php7.0-mbstring php7.0-dom php7.0-gd -y
root@application-server:~# apt-get install libapache2-mod-php7.0
root@application-server:~# apt-get install mysql-client -yTo ensure if both PHP and Apache got installed and configured properly, use these commands:
Code:
root@application-server:~# rm /var/www/html/index.html
root@application-server:~# echo “<?php phpinfo(); ?>” >> /var/www/html/index.phpConfiguring the Database Server
The second configuration you need to do is of the Application server. You need to install MySQL (which is the database language for WordPress) and update the config file. This is going to be easier than the configuration needed for Application server and will take few lines of code.
Use the below commands which will install MySQL on your db server:
Code:
root@database-server:~# apt-get update
root@database-server:~# apt-get upgrade -y
root@database-server:~# apt-get install mysql-server mysql-client -y
root@database-server:~# mysql_secure_installation- Enable Validate Password Plugin?
- Change the password for root?
To confirm that you have installed the MySQL package successfully, try logging in to the server using the below command:
Code:
root@database-server:~# mysql -uroot -p
Code:
root@database-server:~# nano /etc/mysql/mysql.conf.d/mysqld.cnf
Code:
bind-address = 4.4.6.1Now you’ve prepared the server environment where the WordPress application and MySQL application can run properly.
Create the Database
Next thing you need to do is create databases on MySQL server where WordPress-related data will be stored.
Log in to MySQL server with this command:
Code:
root@database-server:~# mysql -uroot -p;
Code:
mysql> CREATE DATABASE wordpress;
mysql> CREATE USER ‘wordpressUser‘@’1.2.3.4‘ IDENTIFIED BY ‘qawsedrf123‘;
mysql> GRANT ALL PRIVILEGES ON wordpress.* TO ‘wordpressUser‘@’1.2.3.4‘;
mysql> FLUSH PRIVILEGES;
Code:
root@application-server:~# mysql -uwordpressUser -p -h4.5.6.7Install WordPress on the App Server
With database out of the way, it’s time to focus on the Application server which is what you and your users will be interacting with.
First thing you have to download the WordPress software which is free of cost. Then you have to establish the connection to the database server and have them communicate back and forth.
On the application server, you need to execute these commands:
Code:
root@application-server:~# cd /var/www/html
root@application-server:/var/www/html# rm -rf *
root@application-server:/var/www/html# wget https://wordpress.org/latest.tar.gz
root@application-server:/var/www/html# tar -xzvf latest.tar.gz
root@application-server:/var/www/html# mv wordpress/* ./
root@application-server:/var/www/html# rm wordpress latest.tar.gz
root@application-server:/var/www/html# chown -R www-data:www-data /var/www/htmlNow you’ve downloaded WordPress successfully and now you have to install. You can do it from the browser. Visit the public IP address of your app server from your browser. If you’ve already pointed the domain name to the IP address, you should use the domain name instead.
From here on, everything will be self-explanatory till you reach the “Run The Installation” step. You should be able to everything on your own. If you get an error, you should verify database connectivity and try again.
Now you’ve successfully configured WordPress which uses an external database.