Steps to set up a WordPress Multisite
Here, it’s a part for you to change few files so that directory of WordPress installation needs FTP for assessment. Hope, You would have experience in doing such things in WordPress Singlesite.
Let us put a small list to fetch details for installation and set up:
Here, it is necessary to check up few things before starting up the installtion. First check, FTP access directly to the directory. Take up the installation backup before starting the process. Ensure the plugins already activated are deactivated or not. Check whether permalink is configured properly or not.
Multisite configuration in wp-config.php file:
You would already check the proper transfer method of FTP. So, its easy to configure the wp-config.php file. Just open the file and add the new command defined below:
That’s it! Now save the wp-config.php file.
WordPress network installation:
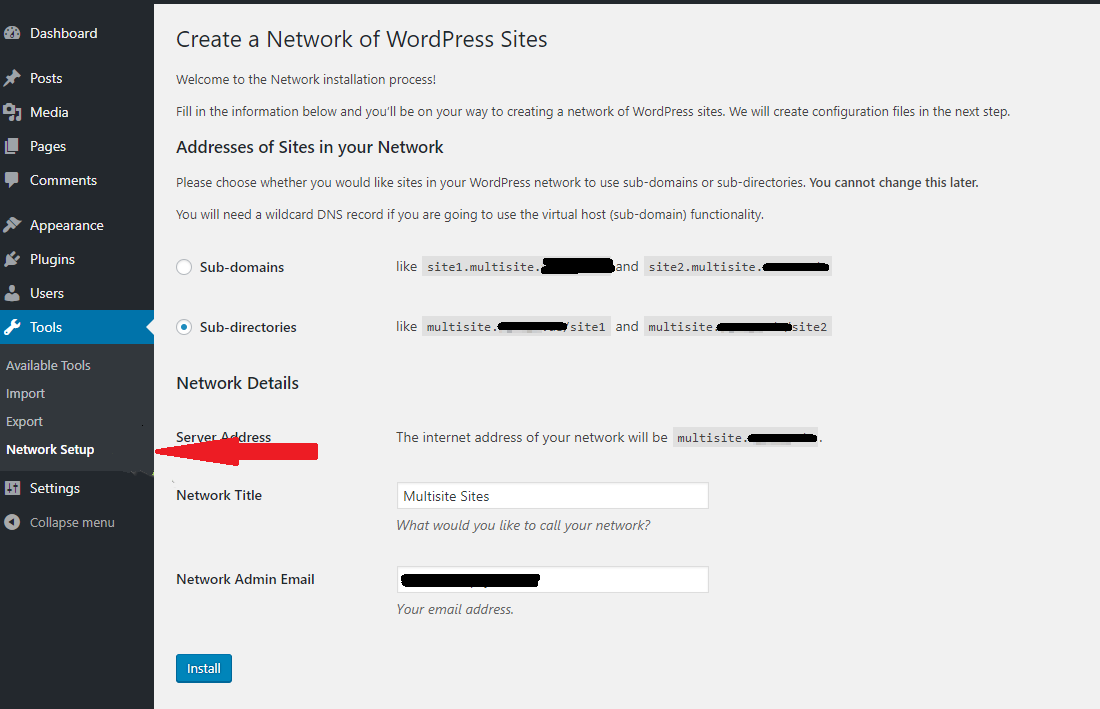
Open the website and login. Go to tools<< Network setup. In this step, you can add the subdomains and fill up the details such as network connection name in Title.
Finally, add email address for privilege and tap on install.
.htaccess and wp-config.php coding part:
By now, you will get the code for two sections such as one for .htaccess and another for wp-config.php file.
Add the code to wp-config.php file. It will look like:
Network settings and administration menu:
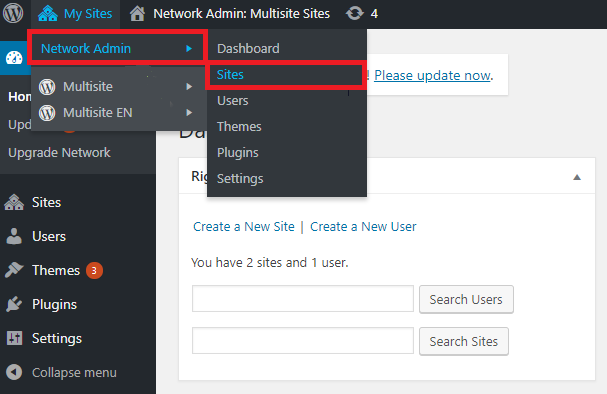
After adding the codes to both .htaccess and wp-config.php then search for network admin which is located at left side of the WordPress. It has few menus listed one by one.
Dashboard: In website, you can add new site and new user.
Site: Network details will be visibled here and so, you can view more options like archieve, deactivate, view, delete and dashboard.
Users: User role will be set according to the website strategy.
Themes: Deactivate or activate it. Install new themes on your choice.
Plugins: Same as like themes – add new plugin or deactivate it.
Settings: Here, you can change the settings of the network details such as themes, plugin and email address.
Website establishment in new network tendency:
1. Mutlisite gives a name by having more website in one WordPress account. Open the WordPress login and search for the option mysite and then click on network admin. Later to site and tap on add new button.
2. Enter the address of the website and sub-directories. Enter the meta description and title name and choose the desired language.
3. Add the site email address and tap on add site. Search for the option network admin and then click on site.
WordPress multisite Themes and Plugin installation:
Go to settings and then click on network settings. After clicking on it, you will get menus from that choose plugin. Click on add new or deactivate it.
That’s it! However installation and setup work will be completed within this 7 steps only. No more executions hardly!
Here, it’s a part for you to change few files so that directory of WordPress installation needs FTP for assessment. Hope, You would have experience in doing such things in WordPress Singlesite.
Let us put a small list to fetch details for installation and set up:
- WordPress Multisite installation.
- Multisite configuration in wp-config.php file.
- WordPress network installation.
- .htaccess and wp-config.php coding part.
- Network settings and administration.
- Website establishment in new network tendency.
- WordPress multisite Themes and Plugin installation .
Here, it is necessary to check up few things before starting up the installtion. First check, FTP access directly to the directory. Take up the installation backup before starting the process. Ensure the plugins already activated are deactivated or not. Check whether permalink is configured properly or not.
Multisite configuration in wp-config.php file:
You would already check the proper transfer method of FTP. So, its easy to configure the wp-config.php file. Just open the file and add the new command defined below:
Code:
define('WP_ALLOW_MULTISITE', true);WordPress network installation:
Open the website and login. Go to tools<< Network setup. In this step, you can add the subdomains and fill up the details such as network connection name in Title.
Finally, add email address for privilege and tap on install.
.htaccess and wp-config.php coding part:
By now, you will get the code for two sections such as one for .htaccess and another for wp-config.php file.
Add the code to wp-config.php file. It will look like:
Code:
define('MULTISITE', true);
define('SUBDOMAIN_INSTALL', true);
define('DOMAIN_CURRENT_SITE', 'My Website');
define('PATH_CURRENT_SITE', '/');
define('SITE_ID_CURRENT_SITE', 1);
define('BLOG_ID_CURRENT_SITE', 1);

Add another code to .htacess file:
style='font-size:12.0pt;color:#595959'>RewriteEngine On
style='margin-bottom:19.2pt;background:#F7F7F7;border:none;mso-border-alt:solid #EFEFEF .75pt;
padding:0cm;mso-padding-alt:10.0pt 10.0pt 10.0pt 10.0pt'>style='font-size:12.0pt;color:#595959'>RewriteBase /style='margin-bottom:19.2pt;background:#F7F7F7;border:none;mso-border-alt:solid #EFEFEF .75pt;
padding:0cm;mso-padding-alt:10.0pt 10.0pt 10.0pt 10.0pt'>style='font-size:12.0pt;color:#595959'>RewriteRule ^index\.php$ - [L]style='margin-bottom:19.2pt;background:#F7F7F7;border:none;mso-border-alt:solid #EFEFEF .75pt;
padding:0cm;mso-padding-alt:10.0pt 10.0pt 10.0pt 10.0pt'>style='font-size:12.0pt;color:#595959'> style='margin-bottom:19.2pt;background:#F7F7F7;border:none;mso-border-alt:solid #EFEFEF .75pt;
padding:0cm;mso-padding-alt:10.0pt 10.0pt 10.0pt 10.0pt'>style='font-size:12.0pt;color:#595959'># add a trailing slash to /wp-adminstyle='margin-bottom:19.2pt;background:#F7F7F7;border:none;mso-border-alt:solid #EFEFEF .75pt;
padding:0cm;mso-padding-alt:10.0pt 10.0pt 10.0pt 10.0pt'>style='font-size:12.0pt;color:#595959'>RewriteRule ^wp-admin$ wp-admin/ [R=301,L]style='margin-bottom:19.2pt;background:#F7F7F7;border:none;mso-border-alt:solid #EFEFEF .75pt;
padding:0cm;mso-padding-alt:10.0pt 10.0pt 10.0pt 10.0pt'>style='font-size:12.0pt;color:#595959'> style='margin-bottom:19.2pt;background:#F7F7F7;border:none;mso-border-alt:solid #EFEFEF .75pt;
padding:0cm;mso-padding-alt:10.0pt 10.0pt 10.0pt 10.0pt'>style='font-size:12.0pt;color:#595959'>RewriteCond %{REQUEST_FILENAME} -f [OR]style='margin-bottom:19.2pt;background:#F7F7F7;border:none;mso-border-alt:solid #EFEFEF .75pt;
padding:0cm;mso-padding-alt:10.0pt 10.0pt 10.0pt 10.0pt'>style='font-size:12.0pt;color:#595959'>RewriteCond %{REQUEST_FILENAME} -dstyle='margin-bottom:19.2pt;background:#F7F7F7;border:none;mso-border-alt:solid #EFEFEF .75pt;
padding:0cm;mso-padding-alt:10.0pt 10.0pt 10.0pt 10.0pt'>style='font-size:12.0pt;color:#595959'>RewriteRule ^ - [L]style='margin-bottom:19.2pt;background:#F7F7F7;border:none;mso-border-alt:solid #EFEFEF .75pt;
padding:0cm;mso-padding-alt:10.0pt 10.0pt 10.0pt 10.0pt'>style='font-size:12.0pt;color:#595959'>RewriteRule ^(wp-(content|admin|includes).*) $1 [L]style='margin-bottom:19.2pt;background:#F7F7F7;border:none;mso-border-alt:solid #EFEFEF .75pt;
padding:0cm;mso-padding-alt:10.0pt 10.0pt 10.0pt 10.0pt'>style='font-size:12.0pt;color:#595959'>RewriteRule ^(.*\.php)$ $1 [L]style='margin-bottom:19.2pt;background:#F7F7F7;border:none;mso-border-alt:solid #EFEFEF .75pt;
padding:0cm;mso-padding-alt:10.0pt 10.0pt 10.0pt 10.0pt'>style='font-size:12.0pt;color:#595959'>RewriteRule . index.php [L]
Save .htaccess and wp-config.php file.After adding the codes to both .htaccess and wp-config.php then search for network admin which is located at left side of the WordPress. It has few menus listed one by one.
Dashboard: In website, you can add new site and new user.
Site: Network details will be visibled here and so, you can view more options like archieve, deactivate, view, delete and dashboard.
Users: User role will be set according to the website strategy.
Themes: Deactivate or activate it. Install new themes on your choice.
Plugins: Same as like themes – add new plugin or deactivate it.
Settings: Here, you can change the settings of the network details such as themes, plugin and email address.
Website establishment in new network tendency:
1. Mutlisite gives a name by having more website in one WordPress account. Open the WordPress login and search for the option mysite and then click on network admin. Later to site and tap on add new button.
2. Enter the address of the website and sub-directories. Enter the meta description and title name and choose the desired language.
3. Add the site email address and tap on add site. Search for the option network admin and then click on site.
WordPress multisite Themes and Plugin installation:
Go to settings and then click on network settings. After clicking on it, you will get menus from that choose plugin. Click on add new or deactivate it.
That’s it! However installation and setup work will be completed within this 7 steps only. No more executions hardly!